


Flipping on virtualization in the BIOS is the very first thing you need to do before running a hypervisor like Proxmox or Hyper-V. It’s what lets a single physical server act like many, running multiple isolated virtual machines (VMs). Think of it as unlocking your CPU's hidden multitasking potential, a feature that’s absolutely essential for modern computing, from a single VPS to a high-availability private cloud.
What Is Hardware Virtualization and Why It Is Essential for Modern Servers

Before you start digging through BIOS menus, it's worth understanding what CPU virtualization actually is. This isn't just some optional toggle; it’s the bedrock of cloud computing and the engine behind high-performance hosting. If you're new to the concept, getting familiar with server virtualisation is a great starting point.
At its simplest, hardware virtualization uses features built right into the processor to create a secure and blazing-fast foundation for running multiple operating systems at once. This is what allows a hypervisor—the software that creates and manages VMs—to directly assign physical resources like CPU cores, RAM, and storage to each isolated environment.
The Key Technologies Behind Virtualization
Modern CPUs from Intel and AMD come packed with specific instruction sets designed just for this purpose. These hardware-level extensions are what make professional-grade virtualization possible, delivering security and performance that software-only emulation could never dream of matching.
- Intel Virtualization Technology (Intel VT-x): This is Intel's solution for creating isolated virtual environments. When you enable it, hypervisors can manage guest operating systems with practically zero overhead, which is critical for ARPHost's KVM-based High-Availability VPS Hosting.
- AMD Virtualization (AMD-V): Known as SVM (Secure Virtual Machine) in some BIOS menus, this is AMD's equivalent. It provides the same hardware-assisted capabilities, ensuring each VM runs securely without stepping on the toes of the host or other VMs.
To make it even simpler, here's a quick breakdown of what you're looking for.
Quick Guide to CPU Virtualization Technologies
This table summarizes the two main technologies you'll encounter. While the names differ, their goal is the same: to unlock your server's true potential for powerful hosting solutions.
| Technology | Vendor | Common BIOS/UEFI Name | Primary Benefit |
|---|---|---|---|
| Intel Virtualization Technology | Intel | Intel VT-x, Virtualization | Enables efficient, hardware-assisted VMs on Intel CPUs. |
| AMD Virtualization | AMD | AMD-V, SVM (Secure Virtual Machine) | Provides the same hardware acceleration for VMs on AMD CPUs. |
Ultimately, whether you have an Intel or AMD system, finding and enabling one of these settings is non-negotiable for deploying any modern hypervisor, including Proxmox VE 9.
Without these features activated, a hypervisor simply won't work correctly. You'll either face massive performance hits or, more likely, your VMs won't launch at all. That’s why enabling virtualization in BIOS is a mandatory first step for any server build, from a home lab to an enterprise cluster. You can learn more about the benefits of server virtualization in our article.
For any business, this directly translates to server consolidation, lower operational costs, and much tighter security—the same principles that drive ARPHost's high-performance secure managed VPS hosting and Proxmox Private Clouds.
The shift to virtualization isn't just a trend; it's a massive industry movement. Market analysis valued the global virtualization software market at USD 12,767 million in 2025, with projections showing a surge to USD 20,352 million by 2034. This explosive growth underscores just how critical virtualization has become for any modern IT strategy.
How to Check If Virtualization Is Already Enabled on Your System
Save yourself a reboot. Before you go digging through the BIOS or UEFI, a few quick commands can tell you if hardware virtualization is already up and running.
This is a routine check for any new server deployment and can save a ton of time. It's the first thing we do when provisioning an ARPHost bare metal server for a new Proxmox private cloud installation, making sure the hardware is ready for heavy lifting from day one.
Verifying Virtualization in Windows
On Windows systems, you’ve got two ridiculously fast methods. The first is the graphical route using Task Manager.
- Hit Ctrl + Shift + Esc to pop open the Task Manager.
- Click over to the Performance tab.
- Select CPU from the panel on the left.
Glance at the right side of the window, and you'll see a line for "Virtualization." If it says Enabled, you're good to go. If it shows "Disabled," a trip to the BIOS is in your future.
If you live in the command line, the systeminfo command gives you a more thorough hardware report. Fire up Command Prompt or PowerShell and run this:
systeminfo
Scroll down to the "Hyper-V Requirements" section at the very bottom. You're looking for the line "Virtualization Enabled In Firmware." If it says Yes, your work here is done.
Pro Tip: If
systeminfoshows that a hypervisor has been detected, it means something like Windows' own Hyper-V is already running and has exclusive control of the virtualization hardware. This can stop other hypervisors, like Proxmox or VirtualBox, in their tracks. We'll show you how to sort this out in the troubleshooting section.
Checking for Virtualization in Linux
For Linux admins, the process is just as simple. The lscpu command is your go-to for a quick summary of the CPU architecture.
Open your terminal and run:
lscpu | grep "Virtualization"
The output will tell you exactly what kind of virtualization the CPU supports, like VT-x for Intel or AMD-V for AMD. This confirms the hardware can do it, but not necessarily that it's turned on.
To be absolutely sure the hardware flags are active, a more definitive check is to grep /proc/cpuinfo directly for the tell-tale flags:
grep -E --color '(vmx|svm)' /proc/cpuinfo
- If you see vmx (Intel) or svm (AMD) lit up in the output, virtualization is enabled and ready.
- If the command comes back empty, the feature is off in the BIOS/UEFI.
Confirming this setting is a non-negotiable first step before you even think about deploying a hypervisor. If your checks come back negative, your next move is to enter the BIOS and enable virtualization in BIOS yourself. If you'd rather have an expert handle the nitty-gritty, ARPHost’s fully managed IT services for servers cover everything from initial hardware setup to ongoing performance tuning.
Navigating Your BIOS or UEFI to Enable Virtualization
Alright, so the system checks came back negative and virtualization is disabled. No sweat. The next stop is your server’s BIOS or UEFI—this is the low-level control panel where you manage core hardware functions, including the switch for virtualization in bios.
To get there, you'll need to reboot your server. As it starts up, keep an eye out for a prompt on the screen telling you which key to press to enter setup. It flashes by quickly, so you might need a couple of tries to catch it. Most of the time, it's one of the usual suspects: DEL, F2, F10, or ESC.
Finding the Virtualization Setting
Once you’re in the BIOS/UEFI, the real fun begins. The exact name and location of the virtualization setting can feel like a moving target, as it varies wildly between motherboard manufacturers and server vendors. I usually start by looking in menus labeled "Advanced," "CPU Configuration," or sometimes even "Security."
Here’s a quick cheat sheet of what you’re looking for:
- Intel Systems: It's almost always called "Intel Virtualization Technology," "Intel VT-x," or just "Virtualization."
- AMD Systems: On AMD hardware, look for "AMD-V," "SVM Mode" (which stands for Secure Virtual Machine), or "Virtualization Extensions."
The flowchart below gives a good overview of the initial check on Windows and Linux before you even need to dive into the firmware.
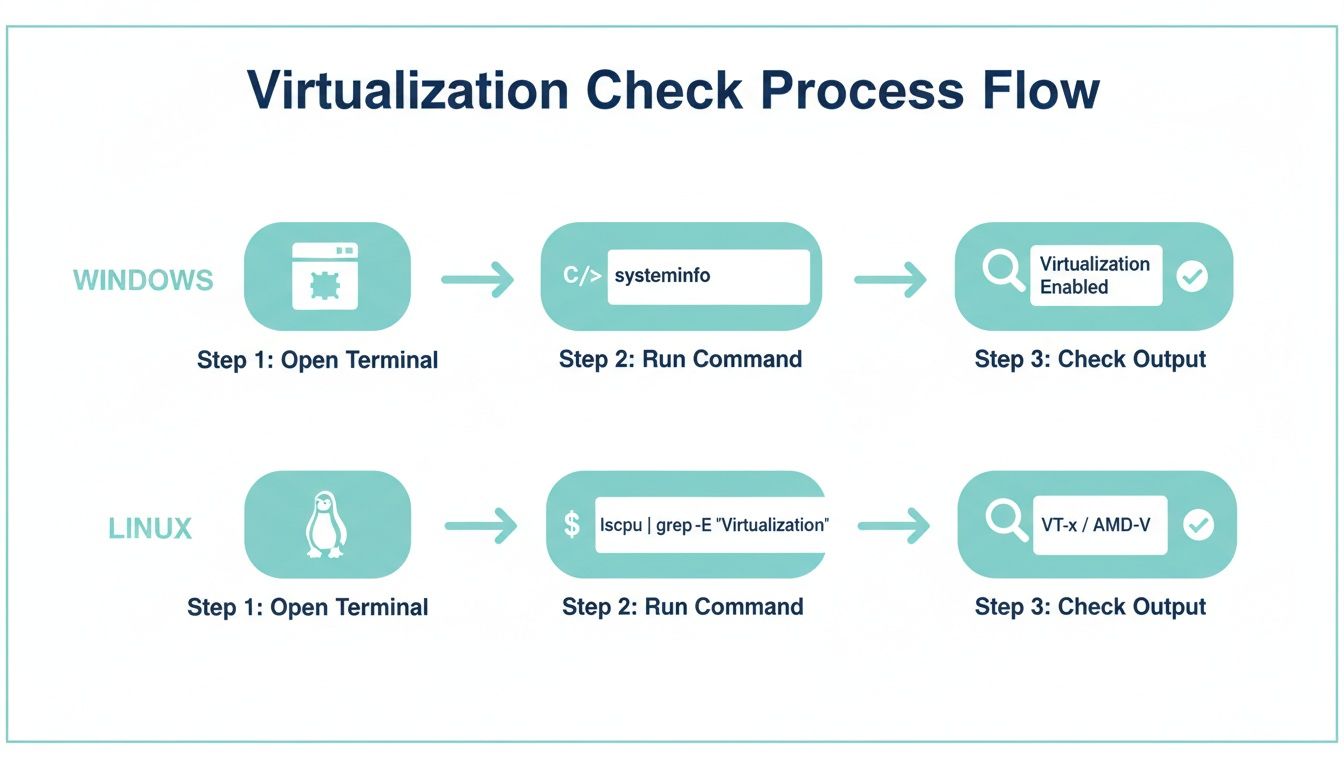
Running this check first saves you a trip into the BIOS if everything is already good to go.
Vendor-Specific Navigation Tips
Navigating firmware can be a pain, especially in a data center. Thankfully, for most enterprise-grade hardware, you can sidestep physical console access by using remote management tools like Dell's iDRAC or HP's iLO. It's a standard part of the workflow when you're setting up a new machine, something we cover in depth in our technical guide on bare metal server provisioning.
Here are a few common paths I've had to take on different server brands:
- Dell PowerEdge Servers: Hit F2 for System Setup, then find your way to
System BIOS > Processor Settings > Virtualization Technology. - HP ProLiant Servers: Press F9 to get into BIOS/Platform Configuration, then go to
System Configuration > BIOS/Platform Configuration (RBSU) > Virtualization Options. - Lenovo ThinkSystem: Head into
UEFI Setup > System Settings > Processors > Intel Virtualization Technology.
Once you've found the setting and enabled it, don't forget to save your changes and exit. The server will restart with virtualization ready to go. This one toggle is the foundation for the entire x86 server virtualization market, which was projected to hit USD 1,523.8 million by 2025. You can dig into the full analysis on x86 server virtualization infrastructure trends if you're curious.
Why ARPHost Excels Here
Tired of hunting through firmware menus and dealing with vendor quirks? We get it. When you order a Dedicated Proxmox Private Cloud from ARPHost, we do all this for you. Our team ensures virtualization is enabled and your hardware is perfectly tuned for performance right out of the box. No more manual, error-prone setup tasks for your team.
With ARPHost's managed services, your bare metal servers are delivered ready for immediate hypervisor deployment. This lets your team skip the low-level hardware wrestling and focus on what really matters: building and managing your virtual environments.
Ready to get straight to building? Explore ARPHost's Dedicated Proxmox Private Cloud plans today and let our experts handle the heavy lifting.
Troubleshooting Common Virtualization Enablement Issues
Even with the best-laid plans, you can hit a wall when trying to enable CPU virtualization. You dive into the BIOS, ready to flip the switch, only to find the setting is greyed out, completely missing, or already enabled but still not working. It's a classic snag.
Don't sweat it, though. I've seen it a hundred times, and it's almost always a conflicting security setting or an existing hypervisor hogging the hardware. Most of these roadblocks are surprisingly easy to clear.
The Virtualization Setting Is Missing or Greyed Out
One of the most common headaches is booting into the BIOS and finding the virtualization option is nowhere to be found, or it's there but stubbornly greyed out. Before you start pulling your hair out, the very first step is to double-check that your CPU actually supports virtualization.
Once you've confirmed it does, the real detective work begins. The culprit is usually one of a few things:
- Outdated Firmware: An old BIOS or UEFI version might not properly expose the setting. This is incredibly common. Your first move should be to check your motherboard or server manufacturer's website for the latest firmware update. A quick flash often makes the option magically appear.
- A Security Feature Is in the Way: Overly cautious security settings like Secure Boot or Intel's Trusted Execution Technology (TXT) can sometimes conflict with and disable virtualization options. Try temporarily disabling these to see if it frees up the setting.
- You're in the Wrong BIOS Mode: This is more of an old-school problem, but some systems required you to be out of legacy boot mode for the setting to show up. It's less frequent now, but still worth a look in your boot settings if you're stumped.
Getting this right is more critical than ever, especially as remote work drives huge growth in desktop virtualization. The market was valued at USD 33.9 billion in 2025 and is on track to hit a staggering USD 174.29 billion by 2034. You can see more data on the growth of the desktop virtualization market on fortunebusinessinsights.com.
A Note on Managed Environments
Wrestling with firmware updates and obscure settings can be time-consuming and risky. For ARPHost customers using our Bare Metal Servers, our 24/7 expert support team is always ready to step in as part of our fully managed IT services. We can help diagnose and resolve these complex hardware conflicts, ensuring your virtualization projects get off the ground without delay.
A Hypervisor Is Already Running
Here's another classic scenario: you've confirmed virtualization is enabled in the BIOS, but your OS still insists it's not available. You might see a message telling you a hypervisor is already active. On Windows, this is almost always because a built-in feature has already claimed the hardware.
Features like Hyper-V, Windows Subsystem for Linux (WSL2), or the Virtual Machine Platform take exclusive control of the CPU's virtualization extensions. This locks out other hypervisors like Proxmox or VirtualBox, which need that direct access.
To fix it, you just need to turn those Windows features off.
- Search for and open "Turn Windows features on or off" from the Start Menu or Control Panel.
- Find the entries for Hyper-V, Virtual Machine Platform, and Windows Hypervisor Platform and uncheck their boxes.
- Click OK and let your system reboot.
Once your machine is back up, your chosen hypervisor should have the exclusive access it needs. This is a vital step for developers juggling different virtualization tools, but for a production server, you'll always get the best stability and performance by dedicating the machine to a single hypervisor.
A Quick-Fix Troubleshooting Guide
When you're staring at an error message, a quick reference can be a lifesaver. Here’s a table summarizing the most common issues and their solutions to help you get back on track fast.
| Common Virtualization Problems and Solutions | ||
|---|---|---|
| Symptom | Potential Cause | Recommended Solution |
| Virtualization setting is greyed out or missing in BIOS/UEFI. | Outdated firmware, a conflicting security setting (Secure Boot, TXT), or an incorrect boot mode. | 1. Update BIOS/UEFI to the latest version. 2. Temporarily disable Secure Boot or other security features. 3. Check and adjust boot mode settings (e.g., disable legacy boot). |
| OS reports virtualization is disabled, but it's enabled in BIOS. | A hypervisor like Hyper-V or WSL2 is already running on Windows and has locked the hardware. | Open "Turn Windows features on or off" and disable Hyper-V, Virtual Machine Platform, and Windows Hypervisor Platform. Reboot the system. |
| Performance is extremely poor inside a VM. | Nested virtualization is not enabled or supported, or power-saving features are throttling the CPU. | Check if your hypervisor and hardware support nested virtualization if you're running a VM inside another VM. In the BIOS, set the power profile to "High Performance." |
| Virtualization works but is reported as "Locked" or "In use." | A third-party security application (like some antivirus suites with "sandboxing" features) is using virtualization extensions. | Temporarily disable the security software to see if it resolves the conflict. If it does, look for an option within that software to disable its hardware virtualization features. |
This table covers the usual suspects. Nine times out of ten, one of these fixes will solve your problem and get your virtualization environment running smoothly.
Ready to skip the troubleshooting? Request a managed services quote at arphost.com/managed-services/ and let our experts handle your server configurations.
Putting Your Virtualization-Ready Hardware to Work with ARPHost

So you've flipped the switch for virtualization in your BIOS. Great. Your hardware is now unlocked and ready for the real work to begin. But a setting is just a setting until you put it to use. The next move is choosing the right platform to actually build and host your virtual machines.
At ARPHost, we build our entire infrastructure around true hardware virtualization. We don’t just support it; we depend on it to deliver the kind of performance and isolation that professional projects demand.
High-Availability KVM VPS Hosting
A Virtual Private Server (VPS) is often the logical first step. But not all VPSs are built the same—not by a long shot. Our High-Availability VPS Hosting plans are built on KVM (Kernel-based Virtual Machine), a true hypervisor that directly taps into the Intel VT-x and AMD-V features you just enabled.
This isn't some OS-level container trickery. This is genuine hardware-level isolation, meaning the resources you pay for are yours and yours alone. Your environment is completely sandboxed, giving you the stability and security needed for running a small business, a developer staging environment, or an e-commerce site.
With ARPHost's KVM infrastructure, you get what you pay for: dedicated resources guaranteed by the hardware itself. It's the professional-grade foundation every serious project needs.
Dedicated Proxmox Private Clouds for Ultimate Control
When a single VPS isn't enough and you need total authority over your environment, a private cloud is the answer. Our Dedicated Proxmox Private Clouds give you the keys to the kingdom, running on powerful bare metal servers where you have complete control.
This is where you can build powerful, scalable clusters for hosting both VMs and LXC containers. You get full root access to the physical hardware, allowing you to configure Proxmox VE precisely how you want. Need to pass through a GPU for an AI workload? Go for it. Building a complex high-availability cluster with CEPH storage? You have the freedom you need with our high-performance clusters starting at just $299/month.
If you're ready to take that step, you can learn more about deploying Proxmox Private Clouds on our dedicated hardware.
Whether you start with a single VPS or go all-in with a private cloud, ARPHost provides the backbone to turn that BIOS setting into a high-performance reality.
Ready to start building? Our VPS hosting plans begin at just $5.99/month, offering an affordable entry into true hardware virtualization. For robust security and easy management, explore our Secure Web Hosting Bundles.
Common Questions About BIOS Virtualization
So, you've toggled the switch in the BIOS, but a few questions might still be nagging you. That's normal. Let's tackle some of the common concerns and edge cases I see all the time.
Is Enabling Virtualization in the BIOS Safe?
Absolutely. Flipping the switch for virtualization in the BIOS is perfectly safe. Think of it as a built-in tool that comes standard with your CPU, designed by Intel and AMD for this very purpose.
It doesn't drain your performance for everyday tasks like browsing the web or checking emails. The feature simply lies dormant until a hypervisor, like Proxmox or VMware, specifically calls on it to spin up a virtual machine.
This isn't just theory; it's standard industry practice. All servers that power ARPHost’s High-Availability VPS Hosting and Dedicated Proxmox Clouds have virtualization enabled from the get-go. It's the foundation for the security, stability, and isolation our clients depend on.
What Should I Do If My BIOS Is Password Protected?
Ah, the locked BIOS. This is a classic headache if you're wrangling your own hardware. You could try to physically reset it by pulling the CMOS battery, but that's a risky move. One wrong step and you could be looking at data loss or even a fried motherboard.
This is precisely where managed infrastructure shines. On an ARPHost Bare Metal Server, you get total, unrestricted control from day one. And for our clients on fully managed IT services plans, our team handles all these configurations. We take on the risk so you can skip the hassle and get straight to work.
Do I Need to Enable Nested Virtualization?
Nested virtualization—running a hypervisor inside another VM—is a pretty advanced use case. It’s mostly for developers building out complex lab environments or intricate testing sandboxes.
While the primary virtualization features (Intel VT-x/AMD-V) are enabled in the BIOS, enabling nesting itself happens at the hypervisor level, not in the firmware.
For instance, on an ARPHost Dedicated Proxmox Private Cloud, this is a setting we can help you configure for specific VMs. This lets you do some powerful things, like running a container environment inside a VM, giving you incredible flexibility for sophisticated development workflows.
Don't worry about performance hits. Simply enabling the virtualization setting in the BIOS will not slow down your computer's normal operations. Those specific CPU instructions only fire up when you are actively running a resource-hungry virtual machine. For everything else, your system runs exactly as it did before.
Ready to move beyond BIOS settings and into a professionally managed environment? ARPHost delivers enterprise-grade infrastructure where performance and security are handled for you. Explore our secure, KVM-based High-Availability VPS Hosting plans starting at just $5.99/month.