

Configuring a static IP on Linux isn't just a technical checkbox; it's the bedrock for any reliable, professional online service. While a dynamic IP can change on a whim, a static IP gives your server a permanent, predictable address. Think of it as the digital equivalent of a brick-and-mortar storefront—it ensures your users and services can always find you.
Why Your Server Needs a Static IP Address
In any serious server setup, relying on a dynamic IP assigned by DHCP (Dynamic Host Configuration Protocol) is a huge liability. It’s like trying to run a business where your street address changes without notice. Customers can't find you, deliveries get lost, and your credibility takes a nosedive. A static IP, on the other hand, is the foundation of dependable online infrastructure.
This stability is absolutely non-negotiable for several core business functions. Imagine running an e-commerce site on a server whose IP address changes overnight. The DNS 'A' record pointing your domain to that server would instantly become useless, taking your site offline and grinding sales to a halt. The same goes for mail servers; they depend on static IPs for their MX records to work. Without one, incoming emails simply won't be delivered, severing critical lines of communication.
A Quick Look at Static vs. Dynamic IPs
Before diving deeper, it helps to see a side-by-side comparison of why one is built for professional use and the other is not.
Static IP vs Dynamic IP for Business Servers
| Feature | Static IP (ARPHost Recommended) | Dynamic IP (Not for Servers) |
|---|---|---|
| Address Stability | Permanent and unchanging. | Changes periodically (e.g., on reboot). |
| Best Use Case | Web servers, mail servers, VPNs, and any public-facing service. | Desktops, laptops, and consumer devices. |
| DNS Reliability | Excellent. 'A' and MX records remain valid indefinitely. | Poor. DNS records break every time the IP changes. |
| Security Management | Simplified. Easy to create precise, permanent firewall rules. | Complex. Firewall rules need constant updating. |
| Service Accessibility | High. Services are always reachable at the same address. | Unreliable. Can cause downtime and connection issues. |
| Professionalism | Essential for business credibility and trust. | Unsuitable for professional hosting environments. |
As you can see, the choice is clear for any server that means business.
Enhancing Security and Reliability
A fixed IP address makes managing your network security dramatically simpler. You can configure firewall rules with pinpoint precision, allowing access from specific, trusted sources while blocking everything else. This is a world away from the headache of trying to manage rules for an IP that’s always in flux. For services that require IP-based authentication or whitelisting, a static IP is the only way to maintain secure, uninterrupted access for authorized users and systems.
Here’s what you gain with a static IP:
- Rock-Solid DNS: Your domain name will always point to the correct server, ensuring your website, APIs, and other services are consistently online.
- Valid SSL Certificates: Many SSL certificates are tied to a specific IP address. A sudden change can trigger validation errors and scary browser warnings that erode customer trust.
- Simplified Firewall Rules: Create permanent, reliable rules for incoming and outgoing traffic, seriously strengthening your security posture.
- Professional Service Hosting: It's absolutely essential for hosting mail servers (SMTP), FTP servers, virtual private networks (VPNs), and game servers that need a constant address to function.
In the world of web hosting, a static IP on Linux is a cornerstone for success. A staggering 96.3% of the world's top 1 million web servers run on Linux, making static IP configurations a fundamental skill for maintaining their stability. For more on this, check out these Linux adoption statistics on commandlinux.com.
It’s also crucial to understand how different actions might affect your server's network identity. For example, knowing Does Rebooting an EC2 Instance Reset Its IP Address can help you build a more resilient IP strategy.
At ARPHost, we understand this principle is fundamental to reliable infrastructure. That’s why all our Secure Web Hosting Bundles and Bare Metal Servers come standard with a dedicated static IP, giving your business the stability it demands right from day one.
Mastering Static IPs on Ubuntu and Debian
When you're wrangling Debian-based systems like Ubuntu, you'll run into two main ways to handle network configuration: the modern, declarative Netplan system and the classic ifupdown utility. Getting comfortable with both is a good idea, especially if you're managing a fleet of servers that span different OS versions. For instance, a fresh ARPHost high-availability VPS running Ubuntu 22.04 will use Netplan right out of the box, but an older Debian 10 instance might still rely on the traditional /etc/network/interfaces file.
Any seasoned developer or IT manager knows that nailing down static IP configuration is fundamental for server stability. It's a core skill that unlocks the true power of Linux, which runs a staggering 49.9% of the top 100,000 websites and 45.4% of the top 1 million sites globally. For these mission-critical applications, letting an IP address change unexpectedly is a recipe for disaster, potentially causing routing failures and serious packet loss.
So, when is a static IP the right call? This decision tree breaks it down nicely.
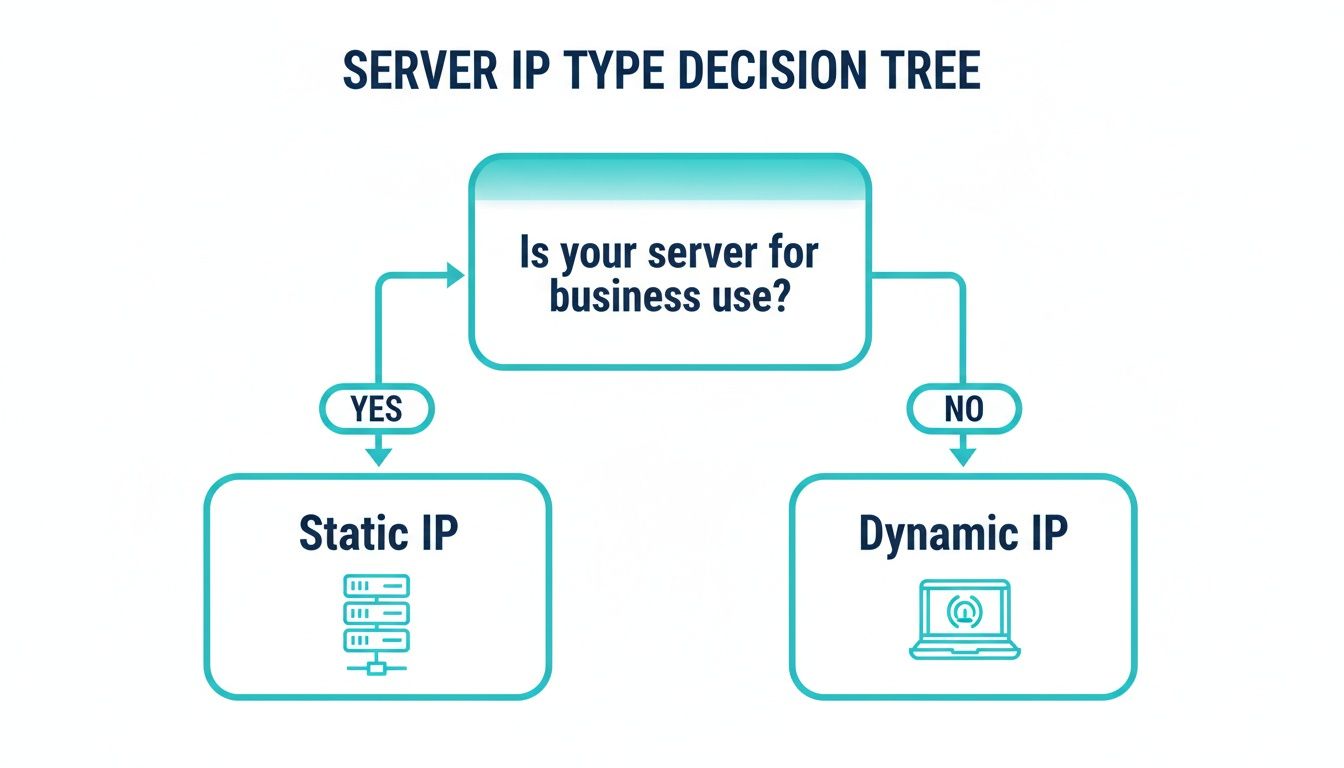
The takeaway is simple: if a server is doing anything important for a business, it needs the reliability of a fixed, predictable IP address.
Configuring with Netplan on Modern Ubuntu Systems
Since its introduction in Ubuntu 17.10, Netplan has become the go-to for network management on modern Ubuntu servers. It swaps out old-school scripts for clean, human-readable YAML files, which helps cut down on typos and misconfigurations. You’ll find these files tucked away in the /etc/netplan/ directory.
The filename will usually look something like 01-netcfg.yaml or 50-cloud-init.yaml. The absolute golden rule with Netplan is strict adherence to YAML syntax. Indentation isn't just for looks here—it defines the structure. A single misplaced space can break the whole thing.
Here’s a real-world example of setting a static IPv4 and IPv6 address on an interface named ens3, a common name for the primary network card you'll find on most virtual servers.
# This file is generated from information provided by the datasource.
# Any changes made here will be overwritten.
network:
  version: 2
  renderer: networkd
  ethernets:
    ens3:
      dhcp4: no
      dhcp6: no
      addresses:
        - 192.0.2.10/24
        - 2001:db8::10/64
      routes:
        - to: default
          via: 192.0.2.1
      nameservers:
          addresses: [8.8.8.8, 8.8.4.4]
Let's quickly break down what's happening in that file:
dhcp4: noanddhcp6: no: These lines are critical. They explicitly shut off DHCP, preventing the interface from automatically grabbing an IP from the network.addresses: This is a list containing the static IPv4 and IPv6 addresses you're assigning, complete with their subnet masks in CIDR notation.routes: This is where you define the default gateway. Any traffic that isn't for the local network gets sent to this IP address.nameservers: This sets the DNS resolvers your server will use to turn domain names into IP addresses.
Once you’ve saved your changes, you don't need to reboot. Just run sudo netplan apply. This command reads your YAML file, generates the right configuration for the backend (systemd-networkd in this case), and applies it on the fly.
The Classic ifupdown Method for Debian and Older Ubuntu
If you're working on a Debian box or an older Ubuntu release (before 17.10), you'll be editing the /etc/network/interfaces file. While it's an older method, it's still powerful, widely used, and gets the job done with a straightforward syntax.
Pro tip: always make a backup before you start editing. A quick sudo cp /etc/network/interfaces /etc/network/interfaces.bak can be a real lifesaver if a typo takes your server offline.
Here’s how you’d set up the exact same static IP configuration using the ifupdown approach for an interface named eth0.
# The primary network interface
auto eth0
iface eth0 inet static
    address 192.0.2.10
    netmask 255.255.255.0
    gateway 192.0.2.1
    dns-nameservers 8.8.8.8 8.8.4.4

# IPv6 configuration
iface eth0 inet6 static
    address 2001:db8::10
    netmask 64
    gateway 2001:db8::1
Let's look at the key lines here:
auto eth0: This tells the system to bring theeth0interface up automatically when the server boots.iface eth0 inet static: This declares the start of the IPv4 configuration block foreth0and specifies that it will use a static address.address,netmask,gateway: These are the bread-and-butter parameters for your IPv4 connection.dns-nameservers: A simple, space-separated list of DNS servers.
Notice the separate iface eth0 inet6 static block—this handles all the IPv6 settings. After saving the file, you can apply the new configuration by either restarting the networking service or, more cleanly, by bouncing the interface with sudo ifdown eth0 && sudo ifup eth0.
For a more in-depth walkthrough of this process, check out our detailed guide on how to configure a static IP on an Ubuntu server.
Configuring IPs on RHEL, CentOS, and Fedora
If you're managing servers running Red Hat Enterprise Linux (RHEL), CentOS, or Fedora, you've probably noticed the networking landscape has changed. The old-school ifcfg script files tucked away in /etc/sysconfig/network-scripts/ still work and are muscle memory for many of us.
But let's be real: the industry standard has moved on. Today, it’s all about NetworkManager and its command-line tool, nmcli. This is the modern, recommended approach because it’s flexible, easy to automate, and standard on all current RHEL-based systems.
These methods are exactly what you’d use in a production environment, whether you're setting up a fresh bare metal server or spinning up a VM inside an ARPHost Dedicated Proxmox Private Cloud. Getting networking right from the start is non-negotiable for any serious workload.
The Modern Approach: Using nmcli
The nmcli tool is your best friend for managing network settings on modern RHEL and its derivatives. It lets you create, tweak, and activate network profiles right from the command line, which is a lifesaver for scripting and automation. No more fumbling with text editors and hoping you didn't introduce a typo.
Let's walk through a classic scenario: assigning a static IP to a network interface named ens18.
First, you need to get the lay of the land. See what connections and devices are currently active. This helps you confirm the device name and find the profile you need to modify.
nmcli connection show
nmcli device status
You'll see a list of connection profiles, probably including one that was auto-generated when you installed the OS. We’ll assume it’s named ens18. We're going to take that existing profile and switch it from DHCP to static.
The following commands will set your IPv4 address, gateway, and DNS servers, then switch the method to manual and apply the changes.
# Set the static IPv4 address and subnet mask
sudo nmcli connection modify ens18 ipv4.addresses 198.51.100.50/24

# Define the default gateway
sudo nmcli connection modify ens18 ipv4.gateway 198.51.100.1

# Set the DNS servers
sudo nmcli connection modify ens18 ipv4.dns "8.8.8.8 8.8.4.4"

# IMPORTANT: Change the method from auto (DHCP) to manual (static)
sudo nmcli connection modify ens18 ipv4.method manual

# Apply the new configuration by bringing the connection down and then up
sudo nmcli connection up ens18
Expert Tip: One of the best things about
nmcliis its transactional nature. Your changes don't go live until you runnmcli connection up. This gives you a moment to double-check your commands before committing, which can save you from accidentally locking yourself out of a remote server.
Configuring a Static IPv6 Address with nmcli
The process for IPv6 is almost identical, which shows how consistent nmcli is. You just swap out ipv4 references for ipv6. Simple as that.
# Set the static IPv6 address and prefix length
sudo nmcli connection modify ens18 ipv6.addresses 2001:db8:1:1::50/64

# Define the IPv6 default gateway
sudo nmcli connection modify ens18 ipv6.gateway 2001:db8:1:1::1

# Set the IPv6 DNS servers
sudo nmcli connection modify ens18 ipv6.dns "2001:4860:4860::8888 2001:4860:4860::8844"

# Change the IPv6 method to manual
sudo nmcli connection modify ens18 ipv6.method manual

# Reactivate the connection to apply all changes
sudo nmcli connection up ens18
The Traditional ifcfg Script Method
Of course, sometimes you're stuck managing older systems or working in an environment where ifcfg scripts are still the standard. Manually editing these files is still a perfectly valid way to get things done. You'll find them in /etc/sysconfig/network-scripts/, with names like ifcfg-eth0 or ifcfg-ens18.
Before you touch anything, always make a backup. It's a simple step that can save you a huge headache.
sudo cp /etc/sysconfig/network-scripts/ifcfg-ens18 /etc/sysconfig/network-scripts/ifcfg-ens18.bak
Now, open the file with nano or vim. Here’s what a complete static configuration for both IPv4 and IPv6 looks like in an ifcfg file.
TYPE=Ethernet
PROXY_METHOD=none
BROWSER_ONLY=no
BOOTPROTO=static
DEFROUTE=yes
NAME=ens18
DEVICE=ens18
ONBOOT=yes

# IPv4 Configuration
IPADDR=198.51.100.50
PREFIX=24
GATEWAY=198.51.100.1
DNS1=8.8.8.8
DNS2=8.8.4.4

# IPv6 Configuration
IPV6INIT=yes
IPV6_AUTOCONF=no
IPV6ADDR=2001:db8:1:1::50/64
IPV6_DEFAULTGW=2001:db8:1:1::1
Let's break down the important lines:
BOOTPROTO=static: This is the key. It tells NetworkManager to ignore DHCP and use the static details you've provided.ONBOOT=yes: Makes sure the network interface comes up automatically at boot time.IPADDR,PREFIX,GATEWAY: Your basic IPv4 address, subnet, and default gateway.IPV6INIT=yes: This switch enables IPv6 on the interface.IPV6_AUTOCONF=no: Tells the system not to use stateless address autoconfiguration (SLAAC) for IPv6.
Once you save the file, you have to restart NetworkManager to make the changes stick.
sudo systemctl restart NetworkManager
While this method works just fine, nmcli is hands-down the safer and more modern choice. It helps you avoid syntax errors and provides instant feedback, making it the superior tool for managing your secure managed VPS hosting or dedicated infrastructure.
If you'd rather let an expert handle this foundational work, request a managed services quote at arphost.com/managed-services/. We'll get your server's networking configured perfectly from day one.
Using Systemd-networkd for Universal Configuration
As systemd becomes the standard init system across most of the Linux world, its built-in networking tool, systemd-networkd, is a game-changer. It offers a powerful and, most importantly, consistent way to handle your network interfaces. Instead of juggling different tools for different distros, you get a clean, file-based approach that works everywhere.
For anyone managing a mix of servers, this is a breath of fresh air. No more jumping between Netplan on Ubuntu and nmcli on CentOS. You learn one syntax, and you're good to go. This makes automation and scripting so much simpler.
This method is perfect for creating standardized templates. Think about environments like ARPHost’s Dedicated Proxmox Private Clouds, where you need to spin up new VMs quickly and reliably. You can build a base image with a pre-configured .network file, ensuring every new machine comes online with the correct static IP settings right out of the box.
Creating Your First .network File
Setting up a static IP with systemd-networkd starts with a simple text file. You just need to create a file ending in .network inside the /etc/systemd/network/ directory.
The filename is actually important because files are read in alphabetical order. A common trick is to prefix them with numbers, like 10-static-ens18.network, to control which rules apply first.
Inside the file, you'll mainly work with two sections: [Match] and [Network].
[Match]: This tellssystemd-networkdwhich interface this configuration is for. You can match by its name (likeens18), its MAC address, or other attributes.[Network]: This is where the magic happens. You define the IP address, gateway, and DNS servers you want to use.
Let's say we want to configure an interface named ens18. We'll create a file at /etc/systemd/network/20-static.network with the following:
[Match]
Name=ens18

[Network]
Address=192.0.2.100/24
Gateway=192.0.2.1
DNS=8.8.8.8
DNS=8.8.4.4
That's it. This simple setup assigns a static IPv4 address, sets the default gateway, and adds two DNS servers. As you can see, you can add multiple DNS= lines if you need more than one.
Key Takeaway: The beauty of
systemd-networkdis its declarative style. You’re not telling it how to set up the network; you’re telling it what the final state should be. The system handles the rest, which cuts down on manual configuration errors.
Adding IPv6 and Applying the Configuration
What about IPv6? It's just as easy. You simply add another Address= line for your IPv6 address and a corresponding Gateway= if you have one.
Here’s our 20-static.network file updated to include both IPv4 and IPv6:
[Match]
Name=ens18

[Network]
# IPv4 Configuration
Address=192.0.2.100/24
Gateway=192.0.2.1

# IPv6 Configuration
Address=2001:db8:1:1::100/64
Gateway=2001:db8:1:1::1

# DNS Configuration
DNS=8.8.8.8
DNS=2001:4860:4860::8888
Once you've saved the file, you'll need to make sure the systemd-networkd service is running and enabled to start on boot.
sudo systemctl enable systemd-networkd
sudo systemctl start systemd-networkd
To apply your new settings, just give the service a quick restart.
sudo systemctl restart systemd-networkd
Adopting this universal approach to setting a static IP on Linux can seriously simplify managing a mixed-distro environment. If you're looking for a deeper dive, you can check out our guide on how to configure a static IP in Linux for more background.
Of course, if you'd rather not deal with the command line at all, ARPHost's fully managed IT services handle every part of your server and network setup, ensuring your infrastructure is solid from day one.
How to Verify and Troubleshoot Your Connection

You’ve edited the files and restarted the services, but don't pop the champagne just yet. You can't just assume it worked. Verification is the most critical final step, because a single typo can leave your server completely stranded on the network, turning a simple tweak into a frantic rescue mission.
Your first port of call, and the ultimate source of truth, is the ip addr show command. It gives you a clean, detailed breakdown of every network interface and the IP addresses they're holding.
Confirming Your Static IP Assignment
Run ip addr show (or its handy alias, ip a) and take a close look at the output. You should see your shiny new static IPv4 and IPv6 addresses listed right under the correct interface, complete with the /24 or /64 prefix you set.
If you’re still seeing an old dynamic IP, or worse, no IP at all, that's your cue. Something is wrong in your config file, or the networking service choked when trying to apply the new settings.
With Linux now on 4.7% of desktops and powering 64.9% of government data centers, knowing these fundamentals is non-negotiable. A static IP is the bedrock of remote management in VPS hosting and colocation, making these checks second nature for any sysadmin. You can find more on these insightful Linux market statistics and see why this matters.
Checking Your Gateway and DNS
An IP address without a route to the internet is like a car with no roads. Next, you need to verify your default gateway with the ip route command. This command lays out the server's routing table. You're looking for a line starting with default via followed by the gateway IP you configured.
- If the gateway is missing: Your server is stuck on its local network. Go back and double-check the
gatewayorroutesentry in your configuration file. - If the gateway is incorrect: You might experience bizarre connectivity issues. Make sure it perfectly matches the address your hosting provider gave you.
Finally, let's see if DNS is working. The quickest way is to ping a well-known domain. If you get a reply, it confirms two things: your server can resolve domain names, and it has a live connection to the outside world.
Why ARPHost Excels Here
Hitting a wall while troubleshooting a remote server’s network is incredibly stressful. Our 24/7 expert support is like having another sysadmin on your team. If you’re wrestling with a tricky config on your ARPHost VPS or dedicated server, we’re ready to jump in, help diagnose the problem, and get you back online fast.
Common Troubleshooting Scenarios
If things aren't working, don't panic. Most of the time, it's one of a few common mistakes that are easy to fix once you know where to hunt.
Here’s a quick-hit checklist for the usual suspects:
- YAML Indentation Errors (Netplan): Just one misplaced space can break the whole file. Seriously. Run your config through a YAML linter to catch these sneaky syntax errors.
- Service Restart Failures: Did the service actually restart cleanly? Check its status (
sudo systemctl status NetworkManagerorsudo systemctl status systemd-networkd) for any revealing error messages. - Incorrect Subnet Mask: A bad subnet mask will prevent your server from properly talking to its gateway, even if the IP is correct.
- Firewall Rules: Is a zealous firewall blocking you? Temporarily flush your rules to see if connectivity magically returns. If it does, you've found your culprit.
By working through these verification steps methodically, you can confidently set a static IP on Linux and ensure your server is stable, secure, and always there when you need it. And if you’d rather not deal with any of this, our fully managed IT services can handle all the complexities of network management for you.
Scaling This with ARPHost
Sure, configuring a static IP on a single Linux server is straightforward enough, as we've just walked through. But what happens when you’re not dealing with one server, but deploying a dozen virtual machines in a Proxmox private cloud? That’s when the process quickly morphs from a simple task into a tedious, error-prone chore that bleeds valuable time.
This is exactly where the manual approach hits a wall. Instead of getting bogged down repeating the same network configurations over and over, you can hand off the entire process to a team of experts who live and breathe this stuff.
From Manual Tasks to Automated Excellence
At ARPHost, we take that repetitive grind and turn it into a smooth, automated operation. Our managed services cover all the foundational server provisioning—that means assigning static IPs, configuring gateways, and locking down initial firewall rules. This gets your team out of the weeds and lets them focus on what actually matters: deploying applications and growing your business.
For any company building an infrastructure that needs to grow, understanding how static IPs underpin larger goals like cloud computing scalability is critical. A managed approach makes sure that foundation is rock-solid from day one.
A huge part of our process for clients on ARPHost Proxmox Private Clouds (starting at $299/month) involves creating standardized VM templates.
- Golden Images: We help you build "golden image" templates with all your networking, security hardening, and OS settings baked right in.
- Rapid Deployment: New VMs can be cloned from these templates in minutes, not hours, each one coming online with a perfect network setup.
- Error Reduction: Automation completely sidesteps the typos and misconfigurations that can cripple a new server before it even gets a chance to do its job.
This strategy makes scaling your environment a fast, reliable process—not a source of late-night headaches and unexpected downtime.
Why ARPHost Excels Here
Our expertise isn't just about running commands; it's about building infrastructure that scales. We don’t just assign an IP address. We architect a network environment that’s ready to support your growth, whether you're running a single VPS or a high-availability Proxmox cluster.
The Ultimate Solution: Fully Managed Hosting
For many businesses, the best solution is to get out of the server management game entirely. Our Secure Web Hosting bundles are a perfect example of this. They come ready to go with a dedicated static IP, proactive monitoring, and powerful security from Imunify360—all completely managed by our team.
You never have to touch a command line or edit a single configuration file. You get all the stability and security benefits of a static IP with zero administrative overhead. This lets you put 100% of your focus on your business while we handle keeping your infrastructure fast, secure, and always online. To learn more about how we can take these tasks off your plate, check out our managed IT services for small businesses.
Explore our Secure VPS Bundles at arphost.com/vps-web-hosting-security-bundles/ and see how a fully managed solution can transform your operations.
Common Questions About Static IPs
When you're knee-deep in server configurations, a few questions about static IPs always seem to pop up. Let's tackle some of the most common ones I hear from admins.
Can I Stick Multiple Static IPs on One Network Interface?
Yes, you absolutely can, and it's a very common setup. This technique is called IP aliasing, and it lets you assign more than one IP address to a single physical network card. It's a lifesaver when you need to host multiple SSL-secured websites on one machine or when you're running different services that have to bind to their own unique IPs for security or routing reasons.
Every major networking tool in Linux handles this without breaking a sweat:
- Netplan: Just add another IP to the
addresseslist in your YAML file. Simple. - NetworkManager (
nmcli): You can use the+syntax to tack on extra IPs, likenmcli con mod eth0 +ipv4.addresses 198.51.100.51/24. ifcfgscripts: The old-school way involves creating alias files, such asifcfg-eth0:0, with the new IP's details.
What's the Real Difference Between a Public and Private Static IP?
Think of it like a street address versus an apartment number. A public static IP is your server's unique, global address on the internet, assigned by your hosting provider (like us at ARPHost). This is the address the whole world uses to reach your public-facing web servers, mail servers, or game servers.
A private static IP, on the other hand, is for internal use only. These addresses, typically in ranges like 192.168.x.x or 10.x.x.x, aren't reachable from the outside internet. They're critical for secure, internal communication between servers, databases, or management interfaces, especially within a setup like a Proxmox private cloud.
Do I Really Need to Reboot After Changing an IP?
No, and you shouldn't. In modern Linux systems, a full reboot just to apply a network change is overkill and introduces unnecessary downtime. It's much better practice to simply restart the specific networking service managing your interfaces.
For instance, on Ubuntu, you'd run sudo netplan apply. On a RHEL or CentOS system, it's sudo systemctl restart NetworkManager. This approach applies your changes instantly while keeping your services online, which is exactly what you want in a production environment.
At ARPHost, we get that you'd rather focus on your projects than on network configs. Our managed services and expert support team can handle all of it for you, ensuring your server is set up for peak performance from day one. Start with our $5.99/month VPS at arphost.com/vps-hosting/ and build on a foundation you can trust.