

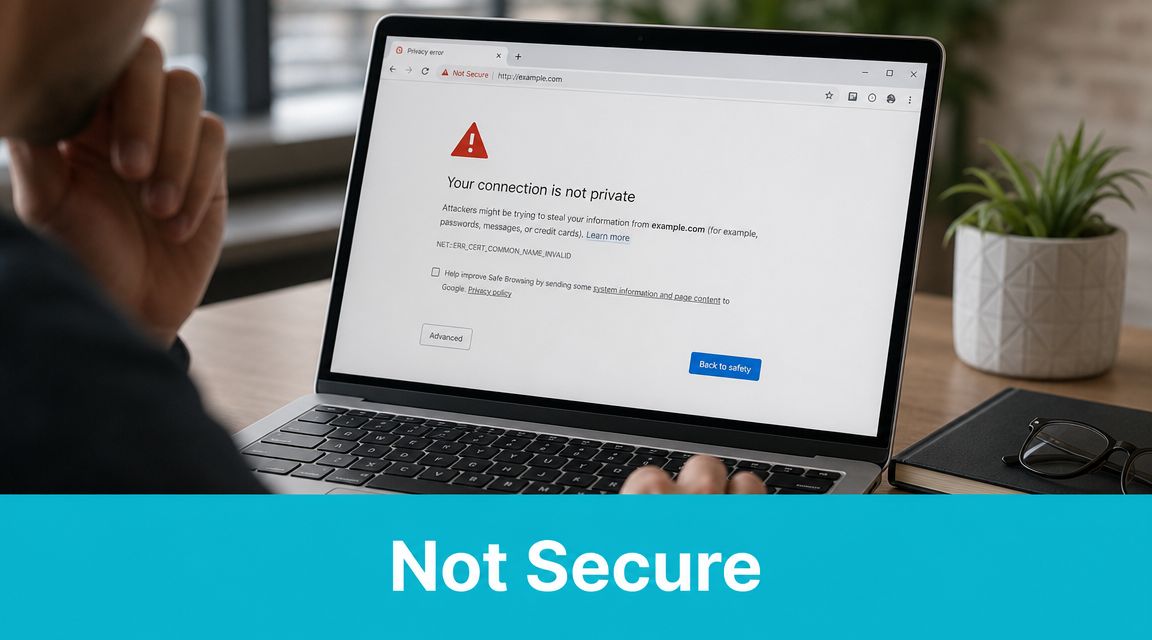
A visitor lands on your site, clicks the product page, and sees a browser warning instead of a padlock. At that point, the problem isn't abstract security hygiene. It's a broken first impression, a trust hit, and often a support ticket waiting to happen.
That's why SSL certificate installation has to be treated like core infrastructure work. If the certificate is wrong, the chain is incomplete, or the private key doesn't match, users don't care why. They just see risk.
Why SSL Certificate Installation is Non-Negotiable
SSL certificate installation used to be a nice-to-have for login pages and checkout flows. That's over. By January 2025, researchers estimated more than 299 million SSL certificates were active on the internet, and by June 2025, 88.08% of websites were using HTTPS, up from 18.5% six years earlier, according to SSL certificate adoption data compiled by SSL Dragon.
That shift matters because HTTPS is now the default expectation. Browsers expect it. Users expect it. Many integrations assume it. Internal tools, APIs, mail-related services, control panels, and reverse proxies all behave better when certificate handling is correct.
SSL certificate installation also isn't just "paste cert, click save." A professional deployment means the hostname matches, the private key matches the CSR used during issuance, the intermediate chain is present, and the live endpoint is tested after the install. Miss any of those and you can still end up with partial trust failures that only show up on certain clients.
Practical rule: If you only verify the browser padlock on your own laptop, you haven't finished the job.
For small and midsize businesses that want a broader security baseline, this guide to cyber security for Canadian SMBs is a useful companion read because certificate deployment works best as part of a larger operational security habit, not as an isolated checkbox.
The rest of the work is straightforward if you stay disciplined. Generate the CSR correctly. Keep the private key under control. Install the certificate on the right platform. Load the intermediate chain. Test the final endpoint from outside the server. That sequence protects uptime and avoids the worst kind of issue: a deployment that looks fine until customers hit it.
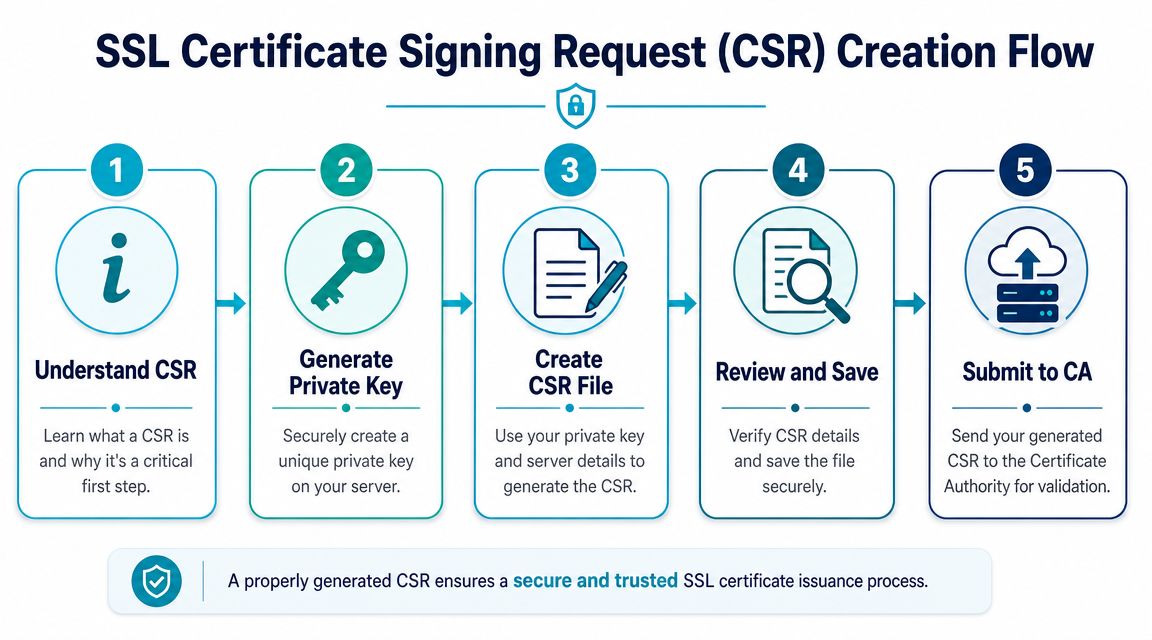
Generating Your Certificate Signing Request
The CSR is where a lot of SSL work gets unexpectedly derailed. The certificate authority uses the CSR to issue the certificate, but the critical asset is the private key created alongside it. Lose control of that key, or generate the CSR on one server and install the certificate against a different key pair, and the installation will fail.
Generate a CSR with OpenSSL
On a Linux VPS or bare metal server, OpenSSL gives you the most direct path. Run this on the server that will use the certificate:
openssl genrsa -out example.com.key 2048
openssl req -new -key example.com.key -out example.com.csr
That creates two files:
- example.com.key is your private key
- example.com.csr is the file you send to the certificate authority
When OpenSSL prompts for details, pay attention to the hostname. For a single-site certificate, the Common Name should match the hostname you intend to secure. If the certificate request doesn't reflect the host you'll terminate TLS on, you're creating cleanup work for later.
A few field notes from real deployments:
- Generate on the destination server: Don't create the CSR on your laptop unless you're intentionally managing private key transfer.
- Protect the key file immediately: Restrict file permissions and keep backups encrypted.
- Name files clearly: Use naming that reflects the hostname and issuance date so renewals don't turn into guesswork.
The private key stays on your side. The CSR goes to the certificate authority. If those roles get blurred, the installation usually gets messy fast.
If you're still choosing the right domain provider before certificate work starts, this domain registrar selection guide helps avoid the common ownership and validation headaches that show up later.
A quick visual walkthrough can also help if you're training a junior admin or documenting the process for a team:
Create a CSR in cPanel
If you're working in cPanel, use the SSL/TLS tools rather than improvising file generation through shell access unless you have a strong reason. The panel flow is simpler for shared hosting and smaller application stacks.
Typical process:
- Open SSL/TLS in cPanel.
- Choose the option to generate a new private key and CSR.
- Enter the domain or subdomain you need to secure.
- Fill in the organizational details if required by your certificate authority.
- Save the private key on the server and copy out the CSR text for submission.
The operational advantage is consistency. cPanel stores the key and CSR in the server context where they'll be used later. That reduces the odds of key mismatch during installation.
Create a CSR in Plesk
Plesk follows the same principle with different menus. Go into the domain's hosting settings or SSL/TLS certificate area, create a new certificate request, and let Plesk generate the private key on the host.
What matters in Plesk isn't the exact button labels. It's that you keep the request tied to the same server context where the certificate will be installed. Don't bounce between Plesk, local terminal sessions, and copied keys unless you have a deliberate key management process.
What works and what doesn't
A short sanity check before you submit the CSR:
| Check | Good practice | Bad practice |
|---|---|---|
| Key location | Created on target server | Created on random workstation |
| File handling | Restricted permissions | Shared over chat or email |
| Naming | Clear hostname-based names | Generic names like server.key |
| Renewal prep | Documented storage path | No notes, no inventory |
If you're on managed hosting, the provider may handle CSR creation inside the platform or through support workflows. On unmanaged servers, you own every step, including key storage, reissue handling, and renewal tracking.
Installing SSL Certificates on Common Platforms
Careful preparation pays off. A technically correct SSL certificate installation follows a strict order: verify the certificate matches the hostname, install the PEM-formatted end-entity certificate, install the matching private key, and add the intermediate chain. Netlify's step-by-step guide also notes that cPanel warns leaving the CA bundle blank can still appear fine in some browsers while breaking compatibility on mobile clients and other non-browser stacks in its SSL installation walkthrough.
That last part catches people all the time. The browser on your desk may show a padlock while another client rejects the chain.
Install in cPanel and WHM
For cPanel and WHM, the safest method is the certificate browser workflow. cPanel's documentation recommends Browse Certificates over relying on domain autofill when possible, because it's more reliable in environments where multiple certificates may exist for the same domain context.
Use this sequence:
- Enter the ServerName or domain.
- Open Browse Certificates and select the correct certificate.
- Click Use Certificate so the fields populate automatically.
- Confirm the selected IP if the domain isn't on a dedicated IP.
- Paste or confirm the CA bundle if the system doesn't fill it.
- Click Install.
- Validate the endpoint immediately after deployment.
The most common cPanel failure isn't pasting the certificate incorrectly. It's attaching the certificate to the wrong private key context. If the CSR was generated elsewhere, or the certificate was renewed and the key changed, reissue may be required.
For a second perspective on panel-based installs and file placement, this walkthrough on cPanel and Nginx SSL setup is useful as a cross-check.
Install on Apache
Apache gives you full control, which is good until someone edits the wrong virtual host. On an unmanaged server, you'll usually place certificate files in a protected directory and reference them inside the TLS-enabled virtual host.
A typical Apache vhost looks like this:
<VirtualHost *:443>
    ServerName example.com
    DocumentRoot /var/www/example.com

    SSLEngine on
    SSLCertificateFile /etc/ssl/example.com.crt
    SSLCertificateKeyFile /etc/ssl/private/example.com.key
    SSLCertificateChainFile /etc/ssl/example.com-ca-bundle.crt
</VirtualHost>
After editing, test the configuration before reload:
apachectl configtest
systemctl reload httpd
or on Debian-based systems:
apache2ctl configtest
systemctl reload apache2
Common Apache mistakes:
- Wrong vhost edited: The certificate is valid, but Apache is serving another site block.
- Key mismatch: The referenced private key doesn't match the certificate.
- Intermediate omitted: Desktop browser looks okay, mobile app fails trust validation.
If Apache sits behind another layer, this reverse proxy configuration guide is relevant because you need to know where TLS terminates before you install anything.
If you don't know which layer owns TLS, stop and map the request path first. Proxy, load balancer, web server, and app host often have different certificate responsibilities.
Install on Nginx
Nginx usually expects the certificate and intermediate chain to be combined into the served certificate file. That's a subtle difference that causes broken chains when admins upload only the leaf certificate.
A common pattern looks like this:
server {
    listen 443 ssl;
    server_name example.com;

    ssl_certificate /etc/nginx/ssl/fullchain.pem;
    ssl_certificate_key /etc/nginx/ssl/example.com.key;

    root /var/www/example.com;
}
In practice:
- Combine the server certificate and intermediate chain in the correct order if your CA provides them separately.
- Point
ssl_certificateto that combined file. - Point
ssl_certificate_keyto the matching private key. - Test syntax.
- Reload Nginx.
Commands:
nginx -t
systemctl reload nginx
What works well on Nginx is disciplined file organization. Keep one directory per hostname or service, and avoid overwriting old files without versioned backups. That makes rollback possible when a renewal is issued with a new key pair.
Install on Microsoft IIS
IIS is less file-centric and more store-centric. You usually import the certificate into the Windows certificate store, then bind it to the site in IIS Manager.
Use this order:
- Open Server Certificates in IIS.
- Complete the pending certificate request or import the issued certificate.
- Confirm the certificate appears in the local machine store.
- Open the target site and edit Bindings.
- Add or update the https binding.
- Select the installed certificate.
- Apply changes and test externally.
The common IIS failure is simple: the certificate is imported successfully but never bound to the right site, hostname, or SNI context. The UI makes that easy to miss if you manage multiple sites on one server.
Verifying and Troubleshooting Your Installation
Installation isn't complete when the service reloads cleanly. It's complete when an external check confirms the right hostname, valid dates, and a full trust chain.
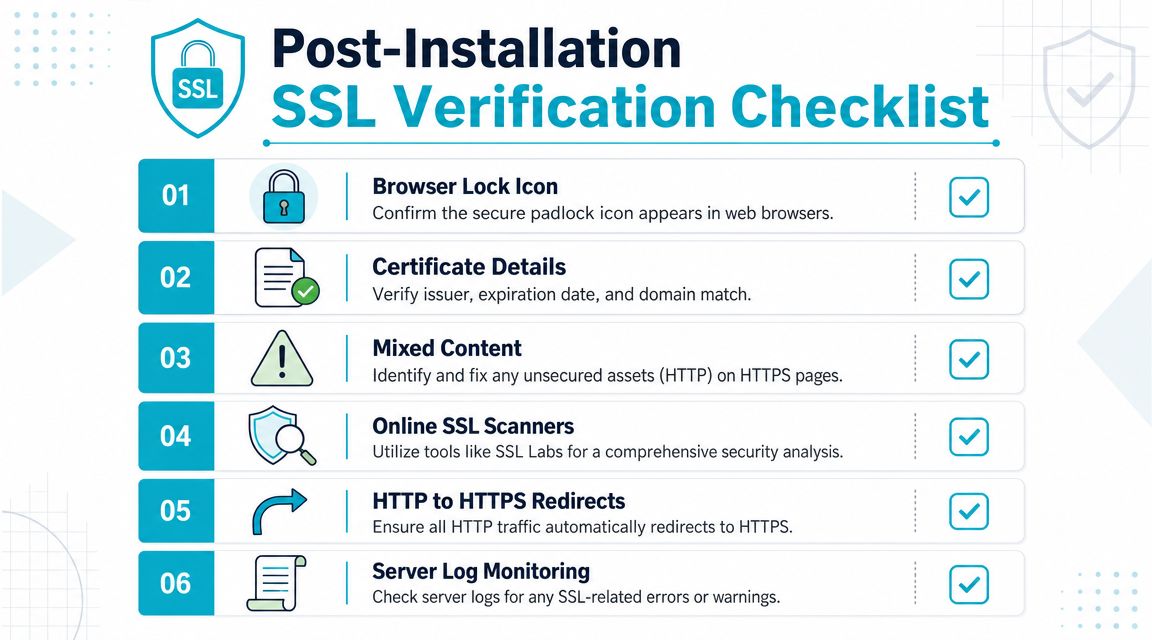
Best-practice deployment guidance from the SSL Labs research wiki warns that a server certificate alone is often not enough, and missing intermediate certificates commonly trigger trust errors and browser warnings in its SSL and TLS deployment best practices. That's why post-install validation matters.
What to check after go-live
Run an external SSL checker as soon as the certificate is live. You want more than a green lock. Check for:
- Hostname match: The certificate must cover the requested domain.
- Chain completeness: Intermediates should be presented correctly.
- Expiration visibility: Make sure the dates shown match the new certificate.
- Key and cert alignment: Some tools will expose mismatch problems quickly.
If you need a clean explainer on why chain validation fails even when the leaf certificate looks fine, this guide to understanding SSL certificate chains is worth bookmarking.
Three issues that show up most often
Incomplete chain
This is the classic issue. The site appears secure in one browser, but mobile devices or API clients reject it. Fix it by installing the intermediate bundle correctly for your platform, then test again.
Hostname mismatch
The certificate was issued for a different host than the one being served. That can happen when a wildcard, SAN certificate, staging domain, or old vhost binding gets mixed into production. Re-check the live endpoint and the certificate subject before replacing files blindly.
Mixed content
The certificate is fine, but the page still throws warnings because it loads scripts, images, or stylesheets over HTTP. This isn't a TLS install failure. It's an application-layer cleanup problem. Update asset references, canonical URLs, and CMS settings.
A working certificate doesn't fix an application that still hardcodes insecure asset URLs.
For teams evaluating internal or temporary certs, this explanation of what a self-signed SSL certificate is is useful because self-signed certs behave very differently from publicly trusted ones and should only be used with a clear purpose.
A simple validation routine
Use this every time:
- Open the site in a browser and inspect the certificate details.
- Run an external SSL checker.
- Test from a mobile device or another network.
- Confirm redirects push HTTP traffic to HTTPS.
- Review server logs for SSL or handshake errors after deployment.
That routine catches most production issues before users do.
Automating Renewals and Advanced Configurations
Manual certificate work used to be manageable when teams renewed infrequently and tracked a short list of endpoints. That model is getting harder to defend. Network Solutions reports that SSL/TLS certificates have a maximum validity of about one year today, with a projected reduction to six months by 2026 and eventually 47 days by 2029, making manual renewal workflows increasingly risky according to its SSL and TLS trend summary.

Use Certbot where automation fits
If you have root access on a VPS or dedicated server, Certbot is usually the first place to look for automated issuance and renewal. The exact plugin depends on your stack, but the operational goal is the same: issue the certificate, install it, and renew it without relying on calendar reminders.
Examples:
certbot --nginx -d example.com -d www.example.com
certbot --apache -d example.com -d www.example.com
For environments where you don't want Certbot editing the server config, use certificate-only mode and wire the files into your own deployment process.
The trade-off is control versus convenience:
- More control: Manual file placement, custom reload hooks, infrastructure-as-code compatibility.
- Less convenience: You have to own the renewal hooks, logging, and failure handling.
Choose the right certificate shape
Not every deployment needs a single-domain certificate. Once you're handling multiple apps or business units, certificate scope matters.
Wildcard certificates are useful when one service family spans many subdomains under the same parent domain. They reduce sprawl, but they also widen the blast radius if the private key is mishandled.
SAN or multi-domain certificates fit better when one endpoint group includes several named hosts that don't fit neatly under one wildcard pattern. They simplify some deployments, especially on shared front ends and consolidated IIS or load balancer setups.
Single-domain certificates are still the cleanest option when isolation matters most. They're easier to reason about and easier to rotate independently.
What changes in larger environments
On multi-server stacks, mail systems, and private cloud environments, certificate management stops being a web-only concern. You may have separate certificates for the website, load balancer, mail submission, IMAP, API gateway, and admin panel. That's where unmanaged infrastructure can become operationally noisy.
For businesses that don't want to run that process end to end themselves, managed hosting or managed IT services can take over issuance, deployment, and renewal handling across those layers. In practice, that means fewer hand-built cron jobs and fewer surprise outages tied to expired or partially installed certs.
Why ARPHost Excels at SSL Management
A common failure pattern looks like this. The public site certificate renews on time, but the load balancer still serves the old chain, webmail presents a different certificate, and mobile users start seeing trust warnings Monday morning. The business impact shows up fast. Login friction, support tickets, and avoidable doubt about whether the service is safe to use.
ARPHost, LLC fits both operating models. Teams that want full control can run their own process on VPS hosting plans, secure web hosting bundles, or Proxmox private cloud options. Teams that would rather stop spending staff time on certificate handling can shift that work into managed operations, where deployment, renewal tracking, and production validation are handled as part of the service.
The difference is not convenience alone. It is operational coverage.
SSL Management comparison
| Task | Unmanaged Server (DIY) | ARPHost Managed Hosting |
|---|---|---|
| CSR generation | You generate and store keys manually | Assisted or handled within managed workflow |
| Certificate install | You place files or bind certs yourself | Support can handle platform-specific deployment |
| Intermediate chain | You must verify and install it correctly | Included in the install process |
| Renewal tracking | You monitor dates and automation jobs | Managed handling reduces missed renewals |
| Troubleshooting | You diagnose key mismatch, chain, and hostname issues | Support assists with production validation |
| Multi-service coverage | You coordinate web, proxy, and mail endpoints | Managed services can cover broader infrastructure |
On an unmanaged server, SSL work rarely stays limited to one virtual host. It spreads into Nginx or Apache includes, IIS bindings, reverse proxies, control panels, SMTP submission, IMAPS, and any internal service exposed through a public hostname. That approach is fine if your team already has tested runbooks, inventory discipline, and someone on call who knows how to trace a chain error under pressure.
Managed hosting fits better when certificate work keeps stealing time from higher-value operations.
Use unmanaged hosting if your team already has a repeatable process for:
- OpenSSL and key management
- Web server reload validation
- Certificate inventory
- Renewal automation
Use managed hosting if these problems keep recurring:
- Renewals complete, but the new certificate does not deploy everywhere
- Different platforms require different install and reload steps
- Web, mail, proxy, and panel certificates are all in scope
- You want support involved when trust warnings or chain errors hit production
For experienced administrators, the trade-off is straightforward. DIY gives maximum control and maximum responsibility. Managed service reduces hands-on control over the mechanics, but it also cuts the risk of an expired certificate, a partial deployment, or a missed dependency taking down user trust at the worst possible time.
If the goal is to offload renewals, validation, and day-two support, review fully managed IT services.