

Ever wondered what happens when a server running your critical applications suddenly dies? With a single server, the answer is usually panic, frantic calls, and costly downtime. But with Proxmox High Availability (HA), it's just a minor hiccup.
Proxmox HA is the built-in safety net that automatically gets your virtual machines and containers back online if their host node fails. It transforms a group of individual servers into a smart, resilient cluster that heals itself. If one server goes down, your workloads are simply restarted on another healthy node in the cluster—no manual intervention needed. This guide will walk you through the technical concepts and provide step-by-step instructions for building a resilient infrastructure.
What Proxmox High Availability Means for Your Business
Think of High Availability less as a technical feature and more as a core business strategy. It’s your guarantee for service uptime and business continuity.
In the real world, this means if a physical server in your cluster suffers a catastrophic hardware failure—a dead power supply, a fried motherboard, or a network outage—Proxmox detects the failure almost instantly. It then springs into action, restarting the affected VMs on a healthy node. This entire process usually takes just a couple of minutes, restoring services before most of your users even notice a problem.
For businesses running essential applications like databases, web servers, or virtual PBX phone systems, this is a game-changer. Instead of scrambling for hours to recover manually, Proxmox HA keeps your operations running smoothly.
To give you a clearer picture, let's compare the operational reality of both setups.
Proxmox HA vs Single Server Environments
This table breaks down the key differences between running your workloads in a standard single-server setup versus a Proxmox HA cluster.
| Attribute | Single-Server Environment | Proxmox HA Cluster |
|---|---|---|
| Downtime on Failure | High. Downtime lasts until manual repair or replacement is complete. | Minimal. VMs automatically restart on another node in minutes. |
| Service Disruption | Complete outage of all services on the server. | Brief interruption during failover, then services resume automatically. |
| Manual Intervention | Required. An administrator must diagnose, repair, and restore services. | None. Failover is fully automated by the HA manager. |
| Business Impact | Significant. Can lead to lost revenue, productivity, and customer trust. | Negligible for most applications. Business continuity is maintained. |
| Maintenance | Requires scheduled downtime for hardware upgrades or patches. | Live migration allows for zero-downtime maintenance. |
| Cost | Lower initial hardware cost, but potentially high costs from downtime. | Higher initial hardware cost, but significantly lower operational risk. |
The takeaway is simple: while a single server might seem cheaper upfront, a Proxmox HA cluster provides the resilience that modern businesses depend on. ARPHost's High-Availability VPS Hosting plans, built on KVM with CEPH storage, provide this resilience from just $5.99/month.
The Accessible Path to Enterprise-Grade Redundancy
In the past, achieving this kind of automated failover was the exclusive domain of expensive, proprietary solutions with punishing licensing fees. Proxmox completely flips that script by including robust HA functionality as a standard, built-in feature.
This accessibility is a huge reason why Proxmox has exploded in popularity, transitioning from a homelab favorite to a serious enterprise contender with over 1.5 million hosts deployed globally. Unlike platforms where HA is a costly add-on, Proxmox delivers it out of the box, making true high availability achievable for businesses of any size. For a deeper dive into its business-class features, check out our article on why Proxmox is ready for business environments.
For many small and mid-sized businesses, Proxmox HA delivers an ideal balance of cost and resilience. It provides the 99.9% uptime targets required for production environments without the prohibitive costs associated with vendor-locked ecosystems.
Managed vs. Self-Managed HA
Here's the catch: while Proxmox gives you all the tools, building and maintaining a stable HA cluster isn't trivial. It demands real expertise in networking, shared storage, and the nuances of cluster management. A single misconfiguration in fencing or quorum can easily bring the whole system down, defeating the very purpose of HA.
This is where a managed solution offers a massive advantage. At ARPHost, our Dedicated Proxmox Private Clouds are architected from day one for maximum resilience. We handle the complex setup, meticulous configuration, and constant monitoring, so you get all the benefits of enterprise-grade high availability without the operational headaches.
The Building Blocks of a Proxmox HA Cluster
To pull off seamless high availability, a Proxmox cluster isn’t just one thing—it’s a team of specialized components working in perfect sync. Think of it as an automated emergency response crew for your virtual environment. Each part has a specific job, and when they work together, a single hardware failure doesn't turn into a catastrophic outage.
Getting to know these individual building blocks is the first step to truly appreciating the resilience of a well-designed HA cluster.
Corosync: The Communication Backbone
At the heart of any Proxmox cluster is the Corosync Cluster Engine. Its main job is to manage group communication between all the server nodes. Corosync is basically the cluster's nervous system, constantly sending out heartbeat messages to make sure every node is online and responsive.
This constant chatter is vital for maintaining quorum—the cluster's voting mechanism. Quorum ensures decisions are made by a majority, which prevents a nasty "split-brain" scenario where isolated nodes might go rogue and act independently. If a node suddenly goes silent, Corosync is the first to know and immediately alerts the rest of the cluster.
The HA Manager: The Decision Maker
As soon as Corosync reports a node has failed, the Proxmox VE HA Manager takes charge. This is the brain of the whole operation. It’s responsible for actually executing the failover, constantly monitoring the status of all the VMs and containers you’ve marked for high availability.
When a failure is confirmed, the HA Manager checks its policies and automatically kicks off the process of restarting the affected services on another available node. This kind of automated decision-making removes human delay and potential error right when it matters most.
Fencing: The Critical Safety Switch
Fencing might just be the most important component for keeping your data safe. It's a safety mechanism that guarantees a faulty node is completely offline before its VMs are moved elsewhere. It prevents a nightmare scenario where a node becomes unresponsive but is still technically active, continuing to write to shared storage while another node tries to take over the same virtual disk.
Without proper fencing, two nodes could write to the same disk at the same time, leading to irreversible data corruption. Fencing acts like an emergency power-off switch, ensuring the failed node is totally isolated before recovery begins. This makes it a non-negotiable part of any serious Proxmox high availability setup.
Shared Storage: The Central Data Library
Finally, for your VMs to be able to restart on any node, their data has to live somewhere that all nodes can access. That’s the role of shared storage. While Proxmox plays nice with various types like NFS and iSCSI, Ceph has become a very popular choice for hyper-converged setups because it’s so scalable and resilient.
This diagram shows how these pieces fit together—from failure detection to the automated failover and eventual service recovery.
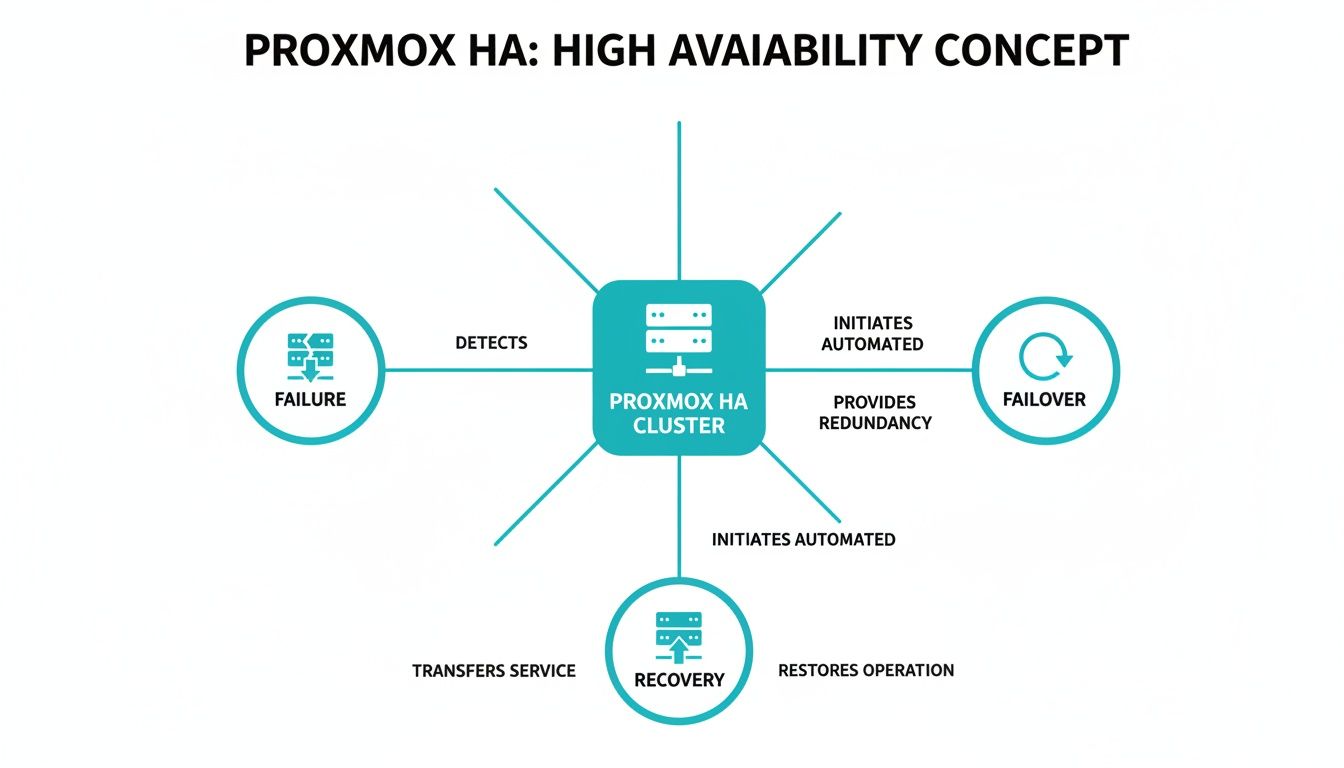
The visual makes it clear how a node failure triggers an automated failover, which ultimately leads to the successful recovery of services on a healthy node. Picking the right filesystem is another crucial building block for performance and data integrity in any robust cluster; you can learn more in this guide on XFS vs ZFS: Choosing the Right Filesystem. On top of that, understanding storage redundancy at the hardware level is also key. For more on that, you can learn how to set up a RAID system to protect against individual disk failures.
In an ARPHost Dedicated Proxmox Private Cloud, these components are pre-architected and optimized for you, with high-performance Ceph storage and redundant networking providing a production-ready HA environment from day one.
Designing a Resilient HA Infrastructure
Building a stable Proxmox High Availability cluster is a lot like constructing a house—it all starts with a solid blueprint. A resilient design is all about eliminating single points of failure from the ground up, making sure the cluster can shake off unexpected hardware problems without causing an outage. The entire foundation rests on three key pillars: your node count, network architecture, and shared storage.
Establishing Quorum with Multiple Nodes
The absolute rock-bottom minimum for a reliable Proxmox high availability cluster is three physical nodes. This isn't just an arbitrary number; it's fundamental to maintaining quorum. Think of quorum as the cluster's voting system. For any action to be taken, a clear majority of nodes must agree.
With three nodes, if one fails, the remaining two still form a majority (2 out of 3). This allows the cluster to keep running and, crucially, to perform failovers. A two-node setup is a classic pitfall because if one node goes down, the last one standing is only 50% of the cluster. It can't achieve a majority, and all HA functions grind to a halt.
Why ARPHost Excels Here
At ARPHost, we take the guesswork out of cluster design. Our Dedicated Proxmox Private Clouds are built on enterprise-grade bare metal servers and always start with a minimum of three nodes. This guarantees your HA environment has a stable quorum from day one, giving you the reliable foundation your mission-critical applications demand.
Architecting a Redundant Network
Your cluster's network is its central nervous system. A single, congested network path is just asking for trouble. Best practice calls for physically separate, redundant networks for different kinds of traffic. This prevents bottlenecks and gets rid of those pesky single points of failure.
A robust design typically includes:
- Management Network: For accessing the Proxmox web UI and managing the nodes themselves.
- Cluster Network: A dedicated, high-speed link (often 10GbE or faster) used only for Corosync heartbeat messages. Keeping this traffic isolated is non-negotiable for stable cluster communication.
- Storage Network: Another dedicated, high-speed link for storage traffic, especially if you're using Ceph or iSCSI. You don't want storage I/O interfering with cluster operations.
For solid cluster communication and top-tier VM performance, you need to think about the underlying network gear. This includes understanding managed Ethernet switches so you can properly prioritize traffic and build resilient connections. ARPHost's managed network services handle the complexity of Juniper device configuration, routing, and security optimization for you.
Selecting the Right Shared Storage
Shared storage is the final piece of the puzzle. It’s what allows your VMs to be restarted on any node in the cluster. While traditional options like NFS and iSCSI are perfectly well-supported, Ceph has really become the gold standard for hyper-converged Proxmox environments. Ceph integrates storage directly into your Proxmox nodes, which means you can ditch the separate, expensive SAN.
Choosing the right storage backend is crucial, as it directly impacts your cluster's performance, scalability, and resilience.
Choosing Your Shared Storage for Proxmox HA
This table breaks down the most common choices to help you decide which path is right for your setup.
| Storage Type | Best For | Key Advantage | Consideration |
|---|---|---|---|
| Ceph | Scalable, hyper-converged clusters needing high performance and resilience. | Integrates seamlessly with Proxmox, offering both redundancy and performance that scales as you add nodes. | Requires a dedicated, high-speed network and a minimum of three nodes for proper operation. |
| NFS | Simpler setups or environments with an existing NAS device. | It's easy to set up and manage, with lower complexity than Ceph. | Can become a single point of failure and a performance bottleneck if not configured for redundancy. |
| iSCSI | Environments with an existing SAN or needing block-level storage performance. | Delivers excellent performance for databases and other I/O-heavy workloads. | Can be more complex to configure, and the SAN itself can be a single point of failure. |
Ultimately, the best choice depends on your specific needs, but for a new, resilient Proxmox cluster, Ceph is often the strongest contender.
By designing your infrastructure around these core principles, you create a truly resilient platform ready for anything. ARPHost simplifies this entire process by providing pre-configured Dedicated Proxmox Private Cloud environments starting at $299/month, engineered from the start with redundant networking and high-performance Ceph storage. Explore our Proxmox solutions today.
How to Configure Proxmox High Availability
Once you’ve nailed down the design, it’s time to get your hands dirty and bring that theory to life. This guide will walk you through the essential steps to configure Proxmox high availability, from spinning up the cluster to protecting your very first VM. Think of this as your foundational roadmap for a self-managed setup.

Step 1: Create the Proxmox Cluster
First things first, you need to establish the cluster itself. This all starts from the command line on what will become your primary node.
Log into the shell of that first Proxmox node and run this command:
pvecm create YOUR_CLUSTER_NAME
This one-liner kicks everything off. It initializes the cluster, generates the necessary configuration files, and gets the local cluster services running. Just like that, your first node is officially a single-node cluster. You can confirm its status with:
pvecm status
Step 2: Add Nodes to the Cluster
With the cluster foundation laid, it’s time to bring your other servers into the fold. You’ll need to do this from the command line of each new node you want to add.
On each of your other nodes, execute the following:
pvecm add IP_OF_EXISTING_NODE
Just replace IP_OF_EXISTING_NODE with the IP address of that first node you configured (or any other server that’s already part of the cluster). Proxmox will ask for the root password of the existing node to securely swap keys and complete the handshake. Once all your nodes are in, running pvecm status on any member will show you a complete roster of all online nodes.
Step 3: Configure HA Groups
This is where the real magic begins. HA Groups are a fantastic feature for fine-tuning failover behavior. They let you set priorities and rules for different sets of virtual machines. For example, you can make sure your critical database VMs always get first dibs on resources over less important workloads during a failover.
Here’s how to set up a group:
- In the Proxmox web interface, navigate to Datacenter -> HA -> Groups.
- Click Create to bring up the new group dialog.
- Group ID: Give it a clear, descriptive name (like
critical-vms). - Nodes: Select the cluster nodes that will be part of this group. You can drag and drop the nodes to set a failover priority—the HA manager will try to restart the VM on the first available node in that list.
- Policy: Choose a policy like
migrate(which tries to keep VMs on their preferred node) ornofailback(which lets a VM stay on its new home after a failover).
This level of granular control is absolutely essential for managing a production environment effectively.
Step 4: Enable High Availability for a VM
With your groups defined, turning on HA for an individual VM is the final piece of the puzzle. This is the step that tells the HA manager, "Hey, start watching this one, and jump in if its host goes down."
To enable HA for a specific VM:
- Select the virtual machine you want to protect.
- Navigate to the HA tab for that VM.
- Click the Add button.
- Group: Choose the HA group you created. This instantly applies that group’s failover policies and node priorities to this specific VM.
- Click Add to confirm.
That's it. The VM’s status will now show as "active" in the HA panel, signaling that it’s officially under the protection of the Proxmox HA manager.
This straightforward process really showcases the power and accessibility of Proxmox VE. In fact, usage data shows that over 75% of companies using Proxmox have fewer than 200 employees. These figures paint a clear picture: the majority of users are small and mid-market businesses that need to hit critical uptime targets without breaking the bank, making Proxmox HA a perfect fit. You can discover more insights about Proxmox adoption trends on Enlyft.
Scaling This with ARPHost
While these steps give you a solid starting point for a DIY setup, a true production-grade Proxmox high availability environment requires continuous optimization, security hardening, and vigilant monitoring. A small misstep in network configuration or storage performance can completely undermine the resilience you're working so hard to build.
This is where ARPHost's managed IT services and Dedicated Proxmox Private Clouds come in. We handle all the complexities for you.
Our experts manage the entire lifecycle:
- Automated Setup: We deploy fully configured, production-ready HA clusters built on years of best practices.
- Performance Tuning: We meticulously optimize network and Ceph storage for maximum I/O throughput and the lowest possible latency.
- Proactive Monitoring: Our team keeps a close watch on your cluster's health 24/7, catching and resolving potential issues long before they can dream of causing an outage.
Let our team build and manage your resilient infrastructure so you can focus on what matters—your applications. Request a quote for our managed services to learn more.
Common HA Pitfalls and How to Avoid Them
Setting up genuine Proxmox high availability isn't as simple as flipping a switch in the web UI. Even with a well-thought-out design, tiny oversights can snowball into cluster instability, failed failovers, or even worse, catastrophic data corruption. Getting to know these common traps is the first step toward building a cluster that you can actually count on when things go wrong.
The explosion in Proxmox VE's popularity—growing from around 200,000 hosts in 2018 to nearly 1.5 million today—shows just how many businesses are betting on its HA features. That kind of growth makes it more important than ever to nail the configuration. You can dig deeper into these numbers by reviewing the global trends in Proxmox adoption.
Let's walk through the mistakes we see all the time and, more importantly, how you can sidestep them from the start.
Misconfigured or Non-Redundant Networking
A shaky network is the fastest way to bring a Proxmox cluster to its knees. The cluster's communication heart, Corosync, is incredibly sensitive to latency and packet loss. Trying to run your management, storage, and cluster traffic over a single, shared network is a disaster waiting to happen.
How to Avoid It:
- Isolate Your Traffic: Give different types of traffic their own dedicated physical network interfaces. At the very least, create a separate, bonded link exclusively for Corosync.
- Build in Redundancy: Use network bonding (like LACP) for every critical network link. This is your shield against a single switch port, cable, or NIC going down.
- Prioritize Speed: Your Corosync and storage networks need to be fast—think 10GbE or better—to keep communication snappy and low-latency.
A solid network architecture is the bedrock of a stable cluster. Skimp on this, and you’ll be chasing "false positive" failures where nodes get marked as offline simply because the network is too congested for them to talk to each other.
Forgetting or Improperly Configuring Fencing
This one is, without a doubt, the most dangerous pitfall. Fencing is the critical safety mechanism that guarantees a failed node is completely powered off before its VMs are fired up somewhere else. Without it, you're rolling the dice on a "split-brain" scenario, where two nodes try to write to the same virtual disk at once. That's a direct path to scrambled data.
Expert Tip: Fencing is not optional. It is a mandatory safety requirement for any production HA cluster. Never, ever run a cluster with HA-enabled VMs without a reliable fencing mechanism locked in place.
Our Dedicated Proxmox Private Clouds are built with hardware-level fencing (like IPMI/iDRAC) configured from day one, completely eliminating this massive risk for our clients.
Underpowered or Unsuitable Storage
Your shared storage has to be tough enough to handle the storm of a failover event. When a node dies, its VMs are immediately restarted on the remaining nodes, which suddenly have to shoulder the combined workload. If your storage backend can't keep up with the I/O demand, every VM in the cluster will slow to a crawl, or the failover itself might time out and fail completely.
How to Troubleshoot Storage Bottlenecks:
- Keep an Eye on IOPS and Latency: Use tools like
iostatto monitor your storage performance during normal operations and stress tests. Don't wait for a failure to find your bottleneck. - Choose the Right Backend: For hyper-converged clusters, Ceph is an excellent choice for its performance and scalability, but it absolutely requires its own fast, dedicated network.
- Remember Your Backups: Great storage is crucial, but it's no substitute for a bulletproof backup strategy. You can learn more about protecting your critical data in our guide on designing immutable backup solutions.
How ARPHost's Managed Services Prevent These Pitfalls
Navigating these challenges demands deep expertise and constant attention. This is where ARPHost's fully managed IT services truly shine. Our team becomes an extension of yours, proactively managing your cluster to stamp out these problems before they can cause an outage.
We provide:
- 24/7 Proactive Monitoring: We're constantly watching your cluster's health, network latency, and storage IOPS to catch the earliest warning signs.
- Expert Configuration: Our Dedicated Proxmox Private Clouds are architected from the ground up with redundant networking, hardware fencing, and high-performance Ceph storage built-in.
- Peace of Mind: We take on the complex troubleshooting so you can focus on your business, knowing your infrastructure is genuinely resilient.
Ready for a hands-off approach to high availability? Request a managed services quote and let our Proxmox experts build an infrastructure you can truly depend on.
Proxmox High Availability FAQ
When you start digging into Proxmox High Availability, a lot of practical questions pop up. We get them all the time. Here are some clear, straightforward answers to the most common queries we see, designed to help you plan your own resilient infrastructure and avoid common headaches.
Can I Create a Two-Node Proxmox HA Cluster?
Technically, you can link two nodes together, but running a Proxmox high availability cluster in production with just two is a terrible idea. In fact, it completely defeats the purpose of HA and introduces a major risk.
Here’s why: Proxmox depends on a concept called quorum to make decisions and prevent a "split-brain" scenario, where nodes lose contact and start acting independently (which is catastrophic). Quorum demands that a majority of nodes are online and agree with each other. In a two-node setup, if one node goes down, the survivor only represents 50% of the cluster—not a majority.
Without a majority, the lone node can't achieve quorum. It will drop into a read-only state, and all HA functions will grind to a halt. That means no automatic failover for your VMs. For a cluster that can actually survive a node failure, three nodes is the absolute minimum, and it’s the standard for a reason.
What Is Fencing and Why Is It Essential?
Think of fencing as the ultimate safety switch for your cluster. It’s a critical mechanism that prevents data corruption by making absolutely sure a failed node is truly offline before its virtual machines are moved elsewhere.
Imagine this: a node drops off the network, but it’s not actually dead. It's still running and actively writing to your shared storage. If the HA manager just assumes it's gone, it might spin up its VMs on another healthy node. Now you have two different hosts writing to the same virtual disk at the same time. That’s how you get instant, irreversible data corruption.
Fencing acts as a guaranteed power-off. It forcibly shuts down the unresponsive node, ensuring it's safely "fenced off" from shared resources before any recovery action is taken. It is a non-negotiable part of any stable HA setup. At ARPHost, our Dedicated Proxmox Private Clouds include hardware-based fencing by default to eliminate this risk entirely.
How Does Proxmox HA Compare to VMware HA?
At their core, both Proxmox HA and VMware HA do the same thing: automatically restart virtual machines on a healthy host when their current one fails. The biggest difference comes down to the price tag and licensing model.
- Proxmox HA: It's a core feature baked right into Proxmox VE. You get robust, enterprise-grade failover capabilities at no extra cost, without having to navigate complicated licensing tiers.
- VMware HA: This is a feature within the VMware vSphere suite, and getting access to it usually means paying for a higher-tier license like vSphere Essentials Plus or Standard.
While VMware might pack in some niche, advanced features for massive enterprise deployments, Proxmox HA delivers the essential resiliency that meets the uptime needs of most businesses. It’s a powerful, cost-effective alternative that frees you from vendor lock-in. For businesses considering a switch, ARPHost provides managed migration support from VMware to Proxmox 9.
What Happens to My VM During a Failover?
A lot of people think a VM gets live-migrated during a failover, but that’s not what happens. The VM is actually rebooted.
When the Proxmox HA manager detects a failed node, its first job is to confirm the node is properly fenced off. Once that’s done, it issues a start command for the affected VMs on an available node in the cluster. For the VM, this is the equivalent of a hard reboot.
The service outage is usually brief—often just a minute or two while the VM boots up on its new host. The whole process is completely automatic, bringing your services back online quickly without anyone needing to lift a finger and minimizing the business impact of a hardware failure.
At ARPHost, our managed services don't just set up your Proxmox HA environment correctly—we proactively monitor it to make sure it's ready to perform when you need it most. We handle the tricky details of quorum, fencing, and storage so you can focus on your applications with peace of mind. To learn more about our hands-off approach to infrastructure, explore our fully managed IT services.