


Knowing how to edit a file in Linux is one of the most fundamental skills for any IT professional. Whether you’re tweaking a server configuration file, automating a deployment script on a bare metal server, or managing a Proxmox virtual environment, you will be working inside a text editor. Broadly, you have two choices: a command-line interface (CLI) editor like Nano or Vim, which is essential for remote server management, or a graphical user interface (GUI) application for desktop-based workflows.
For quick, simple edits directly in the terminal, a common task in managing cloud hosting and virtual servers, Nano is often the easiest entry point for beginners.
Choosing Your Go-To Linux File Editor
Picking the right editor isn’t just a matter of preference; it’s about optimizing your workflow for efficiency and precision. While a GUI editor feels familiar on a local desktop, mastering a CLI editor is non-negotiable for system administrators managing enterprise infrastructure. Headless systems, virtual machines (like KVM or VMware), and private cloud instances rarely have a graphical interface, making the terminal your primary tool for control and configuration.
The editor you choose becomes a core part of your toolkit, and even your choice of server distribution can play a role. For instance, some tools come pre-installed on certain systems, which is something to consider when you compare Debian Server vs Ubuntu Server. A good editor should feel like a natural extension of your hands, enabling you to execute complex tasks with minimal friction.
Finding the Right Tool for the Job
The right tool makes all the difference. An overly complex editor like Vim can feel like overkill when you just need to change one line in a config file, but a basic editor will hold you back during heavy development work. The goal is to match the tool’s power and features to your specific use case, from managing a single bare metal server to orchestrating a large-scale private cloud infrastructure.
For sysadmins managing remote bare metal servers or Proxmox VE clusters, proficiency in a CLI editor like Vim or Nano is not just a preference—it’s a necessity. These tools ensure you can manage any system, anytime, through a simple SSH connection, which is a cornerstone of effective remote virtual server management.
This decision tree gives you a quick visual guide to picking an editor based on your environment and technical comfort level.
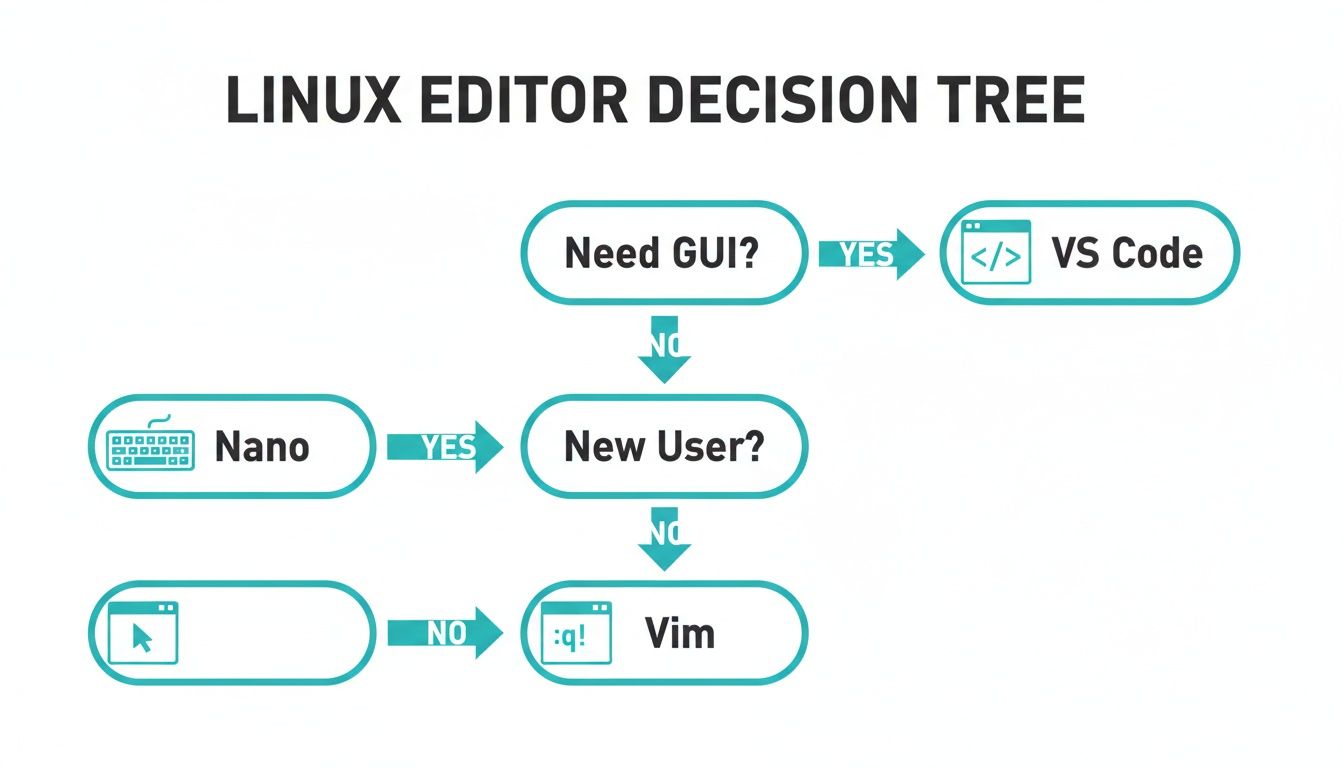
As you can see, the first question is simple: Do you have a GUI? This single question immediately splits the path between desktop-friendly workflows and the command-line world of server administration.
Linux File Editor Comparison CLI vs GUI
To help you decide, here’s a quick rundown of the most common editors you’ll encounter. This table breaks down their ideal user, how hard they are to learn, and where they fit best in an enterprise or professional IT setting.
| Editor | Type | Learning Curve | Best For |
|---|---|---|---|
| VS Code | GUI | Low | Developers needing a full-featured IDE with remote SSH capabilities. |
| Gedit | GUI | Low | Desktop users who need a simple, Notepad-like experience. |
| Nano | CLI | Low | Beginners or sysadmins making quick config file edits in terminal. |
| Vim | CLI | High | Experienced developers and power users seeking maximum efficiency in CLI. |
Ultimately, whether you choose a command-line tool for its raw power and accessibility or a graphical editor for its user-friendly interface, the “best” editor is the one that lets you work efficiently without getting in your way.
Mastering Terminal Editors: Nano and Vim
When you’re logged into a remote server, a GUI is a luxury you often don’t have. This is where terminal editors become indispensable. For most IT professionals, the choice comes down to two classics: Nano for its straightforward usability and Vim for its raw power and efficiency. Mastering both means you can adapt to any system, whether you’re making a quick configuration tweak on a KVM instance or performing complex text manipulations in a shell script.
Getting Started with Nano
Nano is the editor most new Linux users learn first, and for good reason. It’s completely intuitive. The most common commands are always displayed at the bottom of the screen, eliminating the need to memorize complex keybindings. This what-you-see-is-what-you-get approach makes it perfect for getting in, making a change, and getting out quickly.
A common task for a system administrator is editing a user’s Bash profile to configure environment variables. Here is the step-by-step process:
- Open the terminal and connect to your server.
- Open the file using Nano:
nano ~/.bashrc - Navigate with the arrow keys and add your new variables (e.g.,
export MY_VARIABLE="value"). - To save, press
Ctrl+O(which stands for “Write Out”). - Press
Enterto confirm the filename. - Press
Ctrl+Xto exit.
Nano’s on-screen cheat sheet makes it incredibly approachable. Here are the core commands you’ll be using constantly:
- Saving a File: Press
Ctrl+O. This “writes out” your changes to the file on disk. - Exiting Nano: Press
Ctrl+X. If you have unsaved changes, it will prompt you to save them first. - Searching for Text: Use
Ctrl+W(for “Where Is”) to find a specific word or phrase. - Cutting and Pasting: Use
Ctrl+Kto cut an entire line andCtrl+Uto paste it.
This straightforward approach is a major reason why Linux has become so popular in enterprise IT. In fact, 78.5% of developers worldwide now use Linux as a primary or secondary OS. Tools like Nano have helped fuel a 12.6% growth in Linux desktop users because they lower the barrier to entry. For more on these trends, check out this excellent Linux statistics overview.
Unlocking Efficiency with Vim
While Nano excels at simplicity, Vim is engineered for one thing: speed. It’s an editor designed for professionals who live in the terminal and need to work as efficiently as possible. The key to understanding Vim is its “modes,” primarily Normal mode (for commands) and Insert mode (for typing text). This modal design is what makes it so powerful, and what initially challenges beginners.
In Normal mode, your keyboard doesn’t type text; it issues commands. Every key becomes a shortcut for navigating or manipulating your file. To actually start typing, you press i to enter Insert mode. When you’re done, you hit Esc to return to Normal mode.
Vim’s philosophy is about maximizing output with minimal keystrokes. By keeping your hands on the home row, you can navigate, delete, copy, and paste text with incredible speed. It’s a skill that pays off immensely once it becomes muscle memory, especially when managing multiple servers.
Let’s walk through a real-world scenario: you need to edit an Nginx server block to update a domain on a virtual server.
- Open the configuration file with root privileges:
sudo vim /etc/nginx/sites-available/default - You’ll start in Normal mode. Use the following commands to navigate:
- Basic Navigation: Use
h(left),j(down),k(up), andl(right) to move around. - Jumping in the File: Press
Gto go to the last line, orggto jump to the first line. - Searching: Type
/followed by your search term (e.g.,/server_name) and hitEnter.
- Basic Navigation: Use
- Once you find the line you want to edit, press
ito enter Insert mode and make your changes. - When finished, press
Escto return to Normal mode. - To save and quit, type the colon command
:wqand pressEnter. If you made a mistake and want to exit without saving, use:q!.
One of Vim’s killer features is its powerful search and replace. To change every instance of “example.com” to “yourdomain.com” in the entire file, you’d just type this command in Normal mode: :%s/example.com/yourdomain.com/g. That level of precision and control is exactly why so many seasoned sysadmins responsible for private cloud infrastructure swear by Vim.
Going Beyond the Terminal: GUI and Remote Editing Workflows
While terminal proficiency is essential, sometimes a graphical interface is more practical. Especially when working from a Linux desktop, GUI-based text editors like Gedit (the default for GNOME) or Kate (for KDE) offer a familiar feel, much like Notepad on Windows. You get menus, mouse support, and intuitive shortcuts like Ctrl+S to save, no special modes required.
But where things get really powerful is when you combine the comfort of a local GUI editor with the ability to manage files on a remote server. This is the sweet spot for modern development and system administration, letting you edit configuration files on a remote bare metal server or Proxmox VM as if they were local.
Editing Server Files Directly with VS Code
Visual Studio Code has become the industry standard for remote editing, and for good reason. Its “Remote – SSH” extension is a game-changer for anyone managing virtual servers or cloud hosting environments. It lets you open any folder on a remote machine over SSH and work on the files with all the features of a modern IDE, syntax highlighting, code completion, and an integrated terminal.
Here’s a step-by-step guide to setting this up:
- Install VS Code on your local computer.
- Open VS Code, go to the Extensions view (Ctrl+Shift+X), and install the Remote – SSH extension.
- Open the Command Palette (Ctrl+Shift+P on Windows/Linux, Cmd+Shift+P on Mac) and select “Remote-SSH: Connect to Host…”.
- Enter your server connection details in the format
user@your-server-address. - Once connected, you can browse the server’s filesystem in the Explorer panel and open files just like they were local.
This method is incredibly efficient for managing complex configurations on a VPS or bare metal server without the clumsy cycle of downloading, editing, and re-uploading files. For a deeper dive into making that initial connection, check out our guide on how to connect to a cloud VPS.
The Old-School Way: Secure Copy Protocol (SCP)
Before modern IDE integrations, sysadmins relied on the Secure Copy Protocol (scp). It’s a command-line tool for securely transferring files between a local machine and a remote server over SSH. The classic workflow involved copying the file down, editing it locally, and then copying it back up.
For instance, to download a Juniper firewall configuration from a server:
scp user@your-server-address:/config/juniper.conf ./local-juniper.conf
After you’ve finished editing local-juniper.conf, you upload it back:
scp ./local-juniper.conf user@your-server-address:/config/juniper.conf
While
scpis solid and reliable, it lacks the immediacy of modern remote editing tools. The manual steps increase the risk of version conflicts if another admin modifies the file on the server while you are editing your local copy. Tools like VS Code’s remote extension eliminate this problem by working on the file directly where it lives.
The rise of these efficient editing workflows is no surprise, given how widespread Linux has become. With the Linux OS market projected to hit $18.73 billion by 2029, and Linux running 90% of the public cloud, tools that streamline server management are more critical than ever. You can learn more about the expanding Linux market to see just how big the ecosystem is getting.
Automating File Edits with Command-Line Tools
To achieve true efficiency in a Linux environment, you must move beyond interactive, one-by-one file editing. Programmatic file manipulation is a core skill for any system administrator, enabling you to automate changes across dozens or even hundreds of servers at once. This is where non-interactive command-line tools like sed, awk, and tee become essential for managing infrastructure at scale, whether it’s bare metal, private cloud, or a hybrid environment.
These tools aren’t just a convenience; they are fundamental to how Linux operates at scale. Consider this: since 2017, 100% of the world’s top 500 supercomputers have run on Linux. In those environments, petabytes of data and countless configuration files are all managed programmatically. You can see this automation-first mindset trickling down, as shown by Linux’s growing influence on the US desktop market.
Using sed for In-Place Substitutions
The stream editor, sed, is the master of finding and replacing text. Its most powerful feature for sysadmins is the -i flag, which performs “in-place” edits. This modifies the file directly, making it perfect for tweaking configuration files within automated deployment scripts.
For example, to enable .htaccess overrides in an Apache configuration on a new virtual server, you can script the change in one clean command instead of opening the file manually:
sudo sed -i 's/AllowOverride None/AllowOverride All/g' /etc/apache2/apache2.conf
This command finds every instance of AllowOverride None and replaces it with AllowOverride All inside the apache2.conf file. The g flag at the end is crucial, it ensures the command replaces all occurrences on a line, not just the first one.
Parsing Structured Data with awk
While sed handles substitutions, awk is a more sophisticated tool for scanning and processing structured text. It’s designed to work with column-based data, making it invaluable for parsing log files or generating reports from command outputs. awk reads a file line by line, splitting each line into fields that you can manipulate.
A classic use case is extracting specific details from system logs for performance monitoring. To pull just the timestamps and process names from /var/log/syslog, you could use awk:
awk '{print $1, $2, $3, $5}' /var/log/syslog
Here, awk prints the first three fields (the timestamp) and the fifth field (the process name), ignoring everything else. This ability to slice and dice text makes it an indispensable tool for log analysis and data extraction in any automation pipeline.
Programmatic tools like
sedandawkare force multipliers. A command that takes seconds to write can perform a task that would take hours to do manually across a large fleet of virtual servers or bare metal hosts. This is the essence of modern managed IT services.
Viewing and Logging Output with tee
Have you ever needed to save the output of a command to a file while also watching it on your screen in real time? That’s exactly what the tee command is for. It reads from standard input and writes to both standard output (your screen) and one or more files, acting like a “T” splitter in plumbing.
This is extremely useful when running a long script, such as a Proxmox migration, where you need a log for later review without losing the live view.
./long_running_script.sh | tee script_output.log
With this command, everything long_running_script.sh prints is shown on your terminal and simultaneously saved to script_output.log. You get a permanent record without missing any of the action, a best practice for disaster recovery and auditing.
Choosing the Right Tool for Automated Edits
When building automation pipelines, picking the right tool is key. sed is for simple search-and-replace, awk is for complex data parsing, and other tools like ed offer powerful scripting capabilities for more complex, multi-step edits. Here’s a quick breakdown to help you decide.
| Tool | Primary Function | Best Use Case Example |
|---|---|---|
sed | Stream editor for find-and-replace operations. | Updating a configuration value in multiple files with a single command. |
awk | Pattern scanning and text processing language. | Extracting specific columns of data from a log file for a report. |
ed | A line editor for scripted, non-interactive edits. | Applying a complex patch file to a source code file automatically. |
tee | Redirect output to multiple sources. | Logging the output of a script to a file while also viewing it live. |
Mastering these command-line editors is what separates a casual Linux user from a seasoned administrator. They are the building blocks of powerful, scalable automation scripts that can manage entire fleets of servers with ease.
Editing System Files Safely with Root Privileges
Sooner or later, every system administrator needs to edit a critical system file. Whether it’s tweaking your SSH daemon in /etc/ssh/sshd_config, adjusting disk mounts in /etc/fstab, or configuring a Juniper firewall, these are tasks where a minor typo can have major consequences. One wrong character might prevent a server from booting or lock you out entirely.
That’s why knowing how to edit a file in Linux with the right privileges and safety nets isn’t just a good idea, it’s an industry best practice.
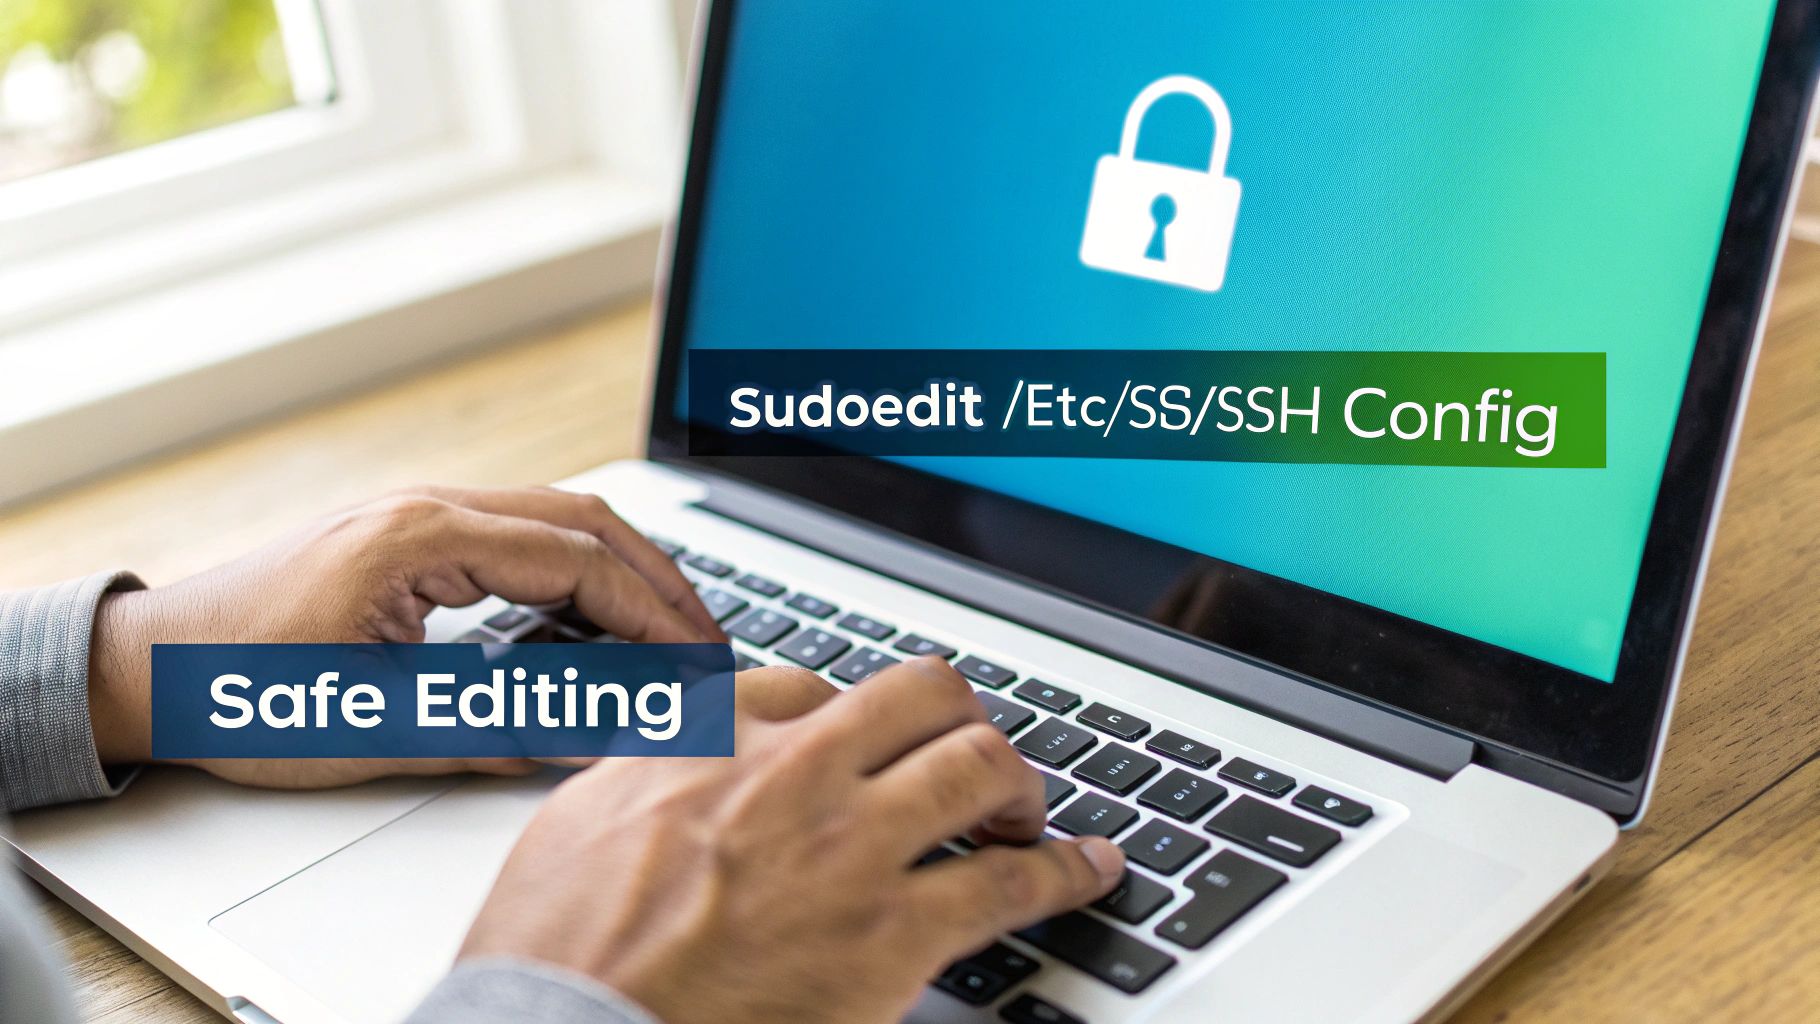
Many people’s first instinct is to use sudo nano or sudo vim. While this works, it runs the entire editor process as the root user, creating an unnecessarily large attack surface for potential security flaws or accidental system damage. There’s a much smarter, more secure method: the sudoedit command.
The Superiority of Sudoedit
The sudoedit command (which can also be invoked with sudo -e) was designed specifically for this purpose. Instead of launching your editor with root privileges, it follows a more secure process:
- It creates a temporary copy of the target file.
- It opens that temporary copy using your regular user’s default editor (defined by the
$EDITORor$VISUALenvironment variables). - You make your changes in this sandboxed copy without any elevated permissions.
- Once you save and quit,
sudoeditchecks for changes and, if any were made, safely overwrites the original file using root permissions.
This whole process dramatically shrinks the attack surface. The editor itself never runs as root.
Using
sudoeditis a core security best practice. It minimizes the time any process runs with root privileges, isolating the risk to a brief, final file-copy operation rather than the entire editing session. This aligns with the principle of least privilege, a cornerstone of secure system administration.
For example, to securely adjust your SSH server settings, you would simply run:
sudoedit /etc/ssh/sshd_config
It’s a small change in habit that reinforces a security-first mindset and helps protect critical infrastructure from avoidable mistakes.
Understanding and Managing File Permissions
Before editing a critical file, it’s wise to inspect its current permissions. The ls -l command provides a detailed view of who can read, write, or execute it.
ls -l /etc/ssh/sshd_config
The output will show the owner, group, and a permissions string like -rw-r--r--. If you need to change these, use chmod for permissions and chown for ownership. For example, if you accidentally misconfigured the permissions on a sensitive file, you could quickly restore them to a secure default:
sudo chmod 644 /path/to/file: This sets read/write for the file’s owner and read-only for everyone else—a common setting for configuration files.sudo chown root:root /path/to/file: This resets the owner and the group back toroot.
Getting comfortable with these commands is fundamental to virtual server management and security. Of course, file permissions are only part of the picture; ensuring your own user and root accounts are secure is just as important. If you need a refresher on managing the system’s most powerful account, you can learn how to securely change the root password in Linux in our other guide. Adopting these safe practices is what separates amateurs from pros and helps prevent costly, late-night troubleshooting sessions.
Common Questions About Editing Files in Linux
Even after you’ve found your favorite editor, a few tricky situations always pop up. Here are some of the most frequent questions sysadmins run into, with practical answers to get you out of a jam.
How Can I Recover an Unsaved File?
It’s a heart-stopping moment: your SSH connection drops or you accidentally close a terminal window before saving. If you were using Vim, don’t panic. Vim has a built-in safety net.
Whenever you edit a file, Vim creates a swap file (e.g., .filename.swp) in the same directory. If your session crashes, this file holds your unsaved changes.
To recover your work, simply try to open the file again. Vim will detect the swap file and present you with recovery options. The simplest way is to run vim -r filename, which will restore the session from that file. Once you’ve successfully saved the recovered version, make sure to manually delete the .swp file to clean up.
What Is a Read-Only File?
If you try to edit a file and get a “read-only” error, it means the file’s permissions are preventing you from making changes. This is a common and intentional safeguard, especially for critical system files in production environments.
To see what’s going on, check the permissions with the ls -l filename command.
An output like -r--r--r-- tells you that only the owner can read the file, and no one has permission to write to it. To make your changes, you’ll either need to become the root user (using a tool like sudoedit) or have the file’s owner grant you write access with the chmod command.
Think of a “read-only” status as a feature, not a bug. It forces a deliberate action—elevating your privileges—before you can modify sensitive files, preventing costly mistakes. This is a key principle in proactive patch management and system hardening.
Can I Edit a File Without Opening It?
Absolutely. In fact, this is one of the cornerstones of Linux automation and scripting. When you need to make a small, predictable change, opening a full editor is overkill. That’s where non-interactive tools like sed shine.
The sed (stream editor) command is perfect for this. Imagine you need to update a configuration parameter across several servers in your private cloud. Instead of opening each file by hand, you can run a single command.
This command finds and replaces a value directly in the file:
sed -i 's/old_value/new_value/' /path/to/your/file.conf
This “in-place” edit is incredibly efficient for deployment scripts, automated maintenance, and ensuring configuration consistency without any manual intervention. It’s a massive time-saver for any managed IT services provider.
How Do I Undo a Change?
Knowing how to quickly undo a mistake is crucial. Luckily, most editors have simple commands for this.
- In Vim: Make sure you’re in Normal mode (hit
Escif you’re not sure) and just pressu. You can press it multiple times to step back through your changes. - In Nano: The key combination is
Alt+U. If you change your mind again, you can redo withAlt+E. - GUI Editors: Nearly every graphical editor on the planet uses the universal
Ctrl+Zshortcut for undoing changes.
Learning these simple commands builds confidence and lets you experiment without fear of permanently messing something up.
Managing files is just one part of maintaining a robust server environment. For a complete solution, from high-performance bare metal servers to managed Proxmox private clouds, ARPHost, LLC provides the infrastructure and expert support your business needs to scale with confidence. Discover our managed hosting solutions.