


When you encounter a 403 Forbidden error on Nginx, it’s like knocking on a door and having the person on the other side see you, understand you, but refuse to let you in. The server understands the request but is deliberately denying access. For system administrators managing bare metal servers or private cloud infrastructure, this error almost always points to a permissions or configuration problem.
Unlike the common 404 error, where a resource is simply missing, a 403 confirms that Nginx found exactly what you asked for. The problem isn’t the location; it’s the lock on the door. This distinction is critical because it immediately narrows your troubleshooting focus from "Is the file there?" to "Why can't Nginx access it?"
At its core, the 403 error is a vital security feature, preventing unauthorized access to sensitive files or directory listings. However, when it starts blocking legitimate traffic on your virtual servers, it’s a high-priority issue that needs immediate resolution.
The most common culprits are typically one of these:
- Incorrect File or Directory Permissions: The Nginx user (often
www-dataornginx) lacks the necessary read/execute permissions for the requested file or its parent directories. - A Restrictive Nginx Rule: An explicit
denydirective within your server block configuration is blocking the request. - A Missing Index File: Nginx is asked to display a directory's contents, but
autoindexis off, and it cannot find a default file likeindex.htmlorindex.php. - Security Module Interference: Mandatory Access Control (MAC) systems like SELinux or AppArmor are enforcing policies that override standard file permissions.
Understanding these potential root causes is half the battle. To help you diagnose the issue more efficiently, here’s a quick reference for the most common scenarios.
Common Causes of Nginx 403 Errors at a Glance
This table breaks down the most frequent root causes for the 403 Forbidden error, helping you quickly identify where the problem might be hiding in your cloud hosting environment.
| Cause Category | Common Examples | First Place to Check |
|---|---|---|
| File/Directory Permissions | Nginx user (www-data) can't read files or execute directories. Directories need execute (x) permissions to be entered. | ls -l on the file and its parent directories. |
| Nginx Configuration | A deny rule is blocking an IP or user agent. The root or index directive points to the wrong place. | Your site's Nginx server block (/etc/nginx/sites-available/). |
| Missing Index File | A request to / or a directory is made, but no index.html, index.php, etc., exists and autoindex is off. | The document root directory for the site. |
| Security Modules (MAC) | SELinux or AppArmor is enforcing a stricter policy than the standard file permissions allow. | sestatus for SELinux; aa-status for AppArmor. |
| File Ownership | Files were uploaded by a user (like root or your personal user) that the Nginx user can't access. | ls -l to check the user and group owners. |
| Upstream Service Issues | The PHP-FPM socket file has incorrect permissions, preventing Nginx from communicating with it. | Check the permissions on the .sock file used by PHP-FPM. |
This systematic approach provides a solid framework for troubleshooting. Most of the time, the solution is just a command or two away. As outlined in detailed guides on common 403 error causes, the fix almost always lies in one of these areas. In the next sections, we'll provide a step-by-step tutorial for diagnosing and resolving each one.
Step 1: Start Your Investigation in the Nginx Logs
Before modifying any configuration files or permissions, your first action when facing a 403 Forbidden error in Nginx should be to check the server logs. Guesswork is a surefire way to waste time and introduce new problems. The logs provide a definitive record of why Nginx denied a request.
This log-first approach turns a vague browser error into an actionable clue, transforming a frustrating guessing game into a targeted technical investigation.
How to Locate and Read the Error Log
On most Linux distributions, the Nginx error log is located at /var/log/nginx/error.log. However, this path can be customized in the main nginx.conf file or within a specific server block. If the log is not in the default location, search your Nginx configurations for the error_log directive to find its current path.
Once located, you don't need to read the entire file. The tail command is an indispensable tool for monitoring new entries in real-time.
To view errors as they occur, use the -f (follow) flag while attempting to access the page that is generating the 403 error:
tail -f /var/log/nginx/error.log
Now, refresh the page that shows the 403 error. A new line should appear in your terminal, providing the exact cause.
Deciphering the Critical Error Message
You are looking for a specific message pattern. The entry that corresponds to a 403 error will almost always contain the phrase (13: Permission denied).
A classic log entry for this issue looks like this:
2023/10/27 10:30:15 [error] 12345#12345: *6789 open() "/var/www/html/index.html" failed (13: Permission denied), client: 192.168.1.10, server: yourdomain.com, request: "GET / HTTP/1.1", host: "yourdomain.com"
This single line provides all the necessary information to solve the puzzle:
- The Problem:
open() ... failed (13: Permission denied). This is Nginx confirming it was blocked from opening a file. - The Target:
"/var/www/html/index.html". It points to the exact file or directory path that has incorrect permissions.
This flowchart illustrates a diagnostic path for troubleshooting, starting with the logs to determine if you have a permission issue or a configuration problem.
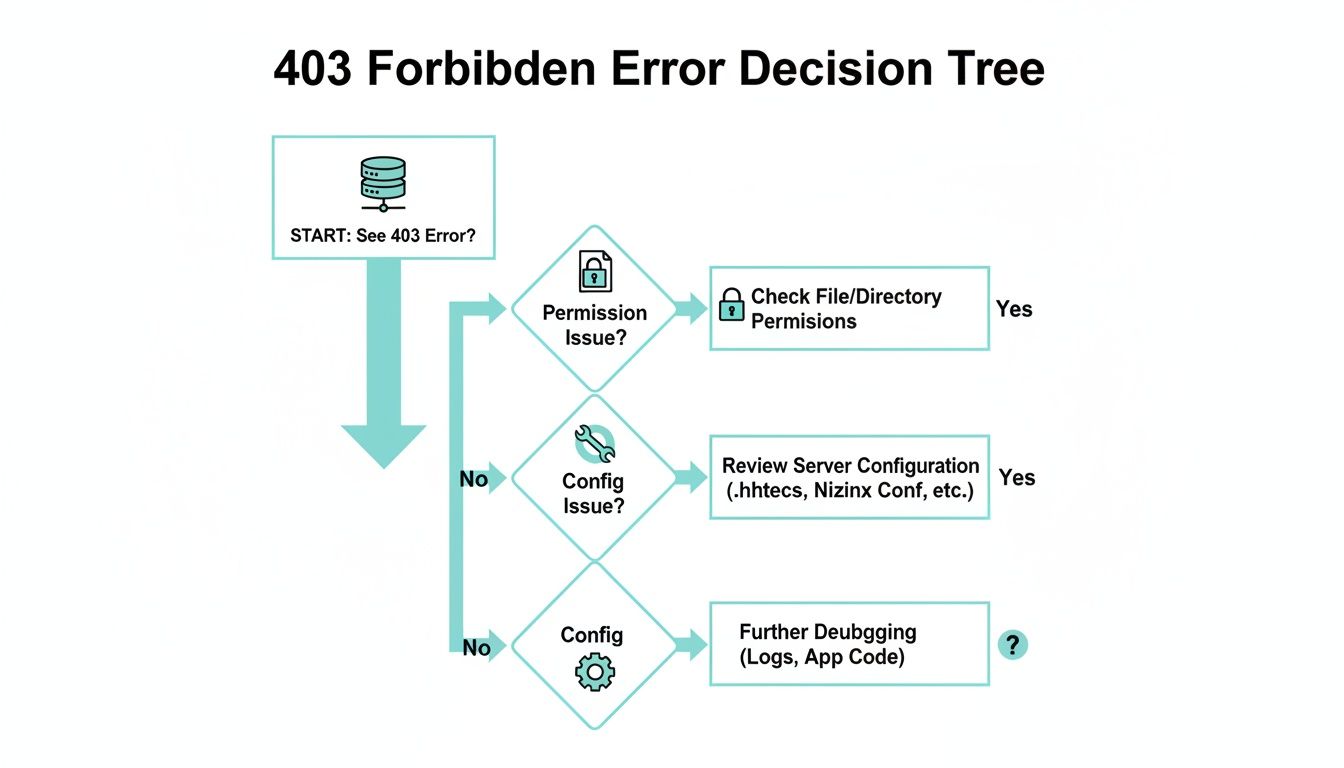
As the diagram shows, a 403 error almost always splits into two main categories: permissions or configuration. Your log analysis dictates which path to follow. With the exact file path from the log in hand, you can confidently proceed to fix the permissions—the most common culprit.
Step 2: Fixing Incorrect File and Directory Permissions
If the Nginx logs confirm a (13: Permission denied) error, you are dealing with the most common cause of the forbidden 403 nginx error. The issue is almost certainly related to file system permissions.
For security, the Nginx process runs as an unprivileged user—typically www-data on Debian/Ubuntu systems or nginx on CentOS/RHEL. This user requires a clear, unobstructed path to read and serve your website's files. If it encounters a permissions roadblock at any point, a 403 error is triggered.
For Nginx to serve a file, its user must have execute (x) permissions on every directory in the path leading to your web root, as well as read (r) permissions on the files themselves. Think of it as a chain; one broken link is all it takes to deny access.

Auditing Current Permissions and Ownership
Before making changes, audit the existing permissions. Navigate to your web root directory (e.g., /var/www/yourdomain) and use ls -l for a detailed listing.
This command provides a snapshot of ownership and permissions.
ls -l /var/www/yourdomain
The output will resemble the following:
drwxr-xr-- 2 root www-data 4096 Oct 27 10:30 assets
-rw-r--r-- 1 root www-data 1234 Oct 27 10:30 index.html
In this example, index.html is owned by the root user and belongs to the www-data group. The permissions -rw-r--r-- mean the owner (root) can read and write, while the group (www-data) and others can only read. This is a secure and correct setup.
Applying Correct Permissions with Chmod and Chown
If your audit reveals incorrect ownership or permissions, it’s time to apply industry best practices. The standard for web servers is 755 for directories and 644 for files. This configuration provides an optimal balance between functionality and security.
755(rwxr-xr-x) for directories: The owner has full control (read, write, execute), while the group and others can only read and execute. The "execute" permission is crucial for allowing users, including Nginx, to traverse the directory.644(rw-r–r–) for files: The owner can read and write the file, while everyone else can only read it. This prevents unauthorized modification of your site's content.
To apply these permissions recursively and safely across your project, navigate to your web root's parent directory (e.g., /var/www/) and execute these two commands:
sudo find yourdomain/ -type d -exec chmod 755 {} ;
sudo find yourdomain/ -type f -exec chmod 644 {} ;
With permissions set, the final step is to ensure the Nginx user owns the files. This is a common oversight, particularly after uploading files as the root user.
sudo chown -R www-data:www-data yourdomain/
Best Practice Recommendation: Always execute
chownafterchmod. This workflow ensures that any ownership issues—often introduced during automated deployments or FTP uploads—are resolved, establishing the Nginx user as the definitive owner.
Fixing permissions is a critical step, but it's part of a broader strategy. Following established website security best practices helps maintain a healthy server environment. For those looking to improve their command-line proficiency, our guide on how to edit a file in Linux is an excellent resource.
After applying these changes, test your website again. The 403 error is likely resolved.
Step 3: Analyzing Your Nginx Server Block for Issues
If you have corrected all file permissions and ownership but the 403 Forbidden error persists, the next step is to inspect your Nginx server block configuration. A single misconfigured directive or an overly restrictive rule in these files can be the source of the access denial.
Unlike permission issues, configuration problems can be subtle. The goal is to identify the specific line where Nginx is being explicitly instructed to deny a request, shifting the investigation from the filesystem to your server's operational logic.
Verifying Root and Index Directives
Begin with the fundamentals: the root and index directives. A simple typo in either can cause Nginx to look in the wrong location, leading to unexpected errors.
The root directive specifies the base directory from which Nginx serves files. Ensure this path is absolutely correct and points to the same directory where you previously fixed permissions.
Next, examine the index directive. This tells Nginx which file(s) to serve when a browser requests a directory. If the specified file—such as index.html or index.php—does not exist and autoindex is disabled, Nginx will return a 403 error.
Here is an example of a standard, correct configuration:
server {
    listen 80;
    server_name yourdomain.com;

    root /var/www/yourdomain/public_html;
    index index.html index.php;

    location / {
        try_files $uri $uri/ /index.php?$query_string;
    }
}
Expert Tip: I have seen this happen countless times: always double-check your
rootpath for simple mistakes like a trailing slash. A seemingly harmless typo like/var/www/yourdomain//can sometimes cause strange resolution issues, leading to a 403 when you'd expect a 404.
Uncovering Explicit Deny Rules
The most direct cause of a configuration-based 403 error is an explicit deny rule. These are valuable for security, often used to block access to sensitive files like .htaccess or log files. However, an overly broad rule can inadvertently block legitimate traffic.
Search your configuration files for blocks similar to these:
location ~ /.ht {
    deny all;
}

location ~* .(log|sql|bak)$ {
    deny all;
}
While these rules represent security best practices, a legitimate file request matching one of these patterns will be blocked. When securing web applications, especially those with APIs, it is crucial to implement REST API security best practices to prevent unintended access denial.
A thorough configuration review often illuminates the problem and presents an opportunity for optimization. This includes ensuring proper security protocols are in place; our guide on how to configure an SSL certificate provides the necessary steps for securing your site. If your configuration appears correct, the issue may lie within a deeper security layer.
Step 4: Checking for SELinux or AppArmor Interference
If you’ve meticulously checked file permissions and Nginx configurations without success, the 403 forbidden error may be caused by an underlying security layer. On modern, hardened Linux systems, standard file permissions are only part of the security model. Mandatory Access Control (MAC) frameworks like SELinux (on RHEL/CentOS) and AppArmor (on Debian/Ubuntu) add a policy-based security layer that can override even perfectly set permissions.
These systems operate on a "least privilege" principle, allowing Nginx to access only the files and directories explicitly permitted by its security policy. If your web content is in a non-standard location or has an incorrect security label, SELinux or AppArmor will block access. This denial is often silent in Nginx's error logs, making it a frustrating problem to diagnose.
Diagnosing SELinux Denials
On systems like CentOS, RHEL, or Fedora, SELinux is the probable cause. First, check its current status.
sestatus
If the command returns Enforcing, SELinux is actively blocking any action that violates its policy. The key to diagnosis lies in the audit log, typically found at /var/log/audit/audit.log. Use the ausearch tool to filter for recent Nginx-related denials.
sudo ausearch -m AVC -ts recent
Look for entries where comm is nginx and type is AVC (Access Vector Cache). These log entries are the definitive proof, showing exactly which Nginx process was denied access to which specific resource.
Key Takeaway: The audit log is your ground truth for SELinux issues. An AVC denial for Nginx confirms the 403 error isn't a simple file permission problem but a security policy conflict that you need to resolve.
Correcting SELinux Contexts
Once a denial is identified, the solution is usually to apply the correct security context to your files. SELinux labels every file and process, and access is granted only when the labels align with policy rules.
View the current context of your web files with ls -Z.
ls -Z /var/www/yourdomain/index.html
If the context is incorrect (e.g., unconfined_u:object_r:user_home_t:s0), you must change it to a context Nginx is allowed to read, such as httpd_sys_content_t.
The recommended tool for this task is restorecon, which applies the default system policies correctly.
sudo restorecon -Rv /var/www/yourdomain/
This command recursively scans the directory and restores the correct, default security contexts, often resolving the 403 error instantly. For a more comprehensive approach to server hardening, refer to our guide on how to secure a web server.
On Ubuntu or Debian systems running AppArmor, the process is similar: check its status with aa-status, look for denials in /var/log/kern.log, and adjust the Nginx profile located in /etc/apparmor.d/.
Lingering Questions About the Nginx 403 Error
Even after resolving the immediate issue, some scenarios can repeatedly trigger the forbidden 403 nginx error. Understanding these common situations is key to shifting from reactive troubleshooting to proactive virtual server management. Let's address some of the most frequently asked questions.
Why Do I Get a 403 Right After a New Deployment?
This is a classic problem in automated IT environments. You push new code via a CI/CD pipeline, and the site becomes inaccessible. The cause is almost always a file ownership mismatch.
Your deployment script likely ran as the root user, creating a new set of files and directories that now belong to root. The Nginx worker process (running as a non-privileged user like www-data) cannot read them. The operating system denies access, and Nginx correctly returns a 403.
Solution: Integrate a final step into your deployment pipeline that executes chown and chmod to recursively set the correct owner and permissions on all newly deployed assets. Automating this step prevents the issue from recurring.
Can a Missing Index File Really Cause a 403?
Yes, this is an extremely common cause. By default, Nginx has its autoindex directive turned off for security reasons—you generally don't want to expose your server's file structure to the public.
When a user navigates to a directory (e.g., yourdomain.com/uploads/), Nginx looks for a file specified in its index directive (like index.html or index.php). If it cannot find a matching file and autoindex is disabled, it is in a deadlock. It cannot serve a non-existent file, and it is forbidden from listing the directory's contents. The result is a 403 error.
Solution: Either place a valid index file in the directory or, if directory listing is intended and secure, enable it by adding autoindex on; inside the relevant location block in your configuration.
How Can I Tell a 403 From a 404 in My Logs?
Your Nginx error log provides a clear distinction between these two errors once you know what to look for.
- A 404 (Not Found) error means the requested path does not correspond to an existing resource. The log entry will explicitly state
(2: No such file or directory). - A 403 (Forbidden) error means the file was found, but the server was denied access. The log entry will state
(13: Permission denied).
Checking your error.log for these specific phrases is the fastest way to diagnose which problem you are solving.
Could My Web Application Firewall Be the Problem?
Absolutely. A Web Application Firewall (WAF) like ModSecurity is designed to inspect all incoming HTTP traffic and block requests that match known attack patterns.
Occasionally, a legitimate user action can trigger one of these security rules. When this occurs, the WAF instructs Nginx to block the request, resulting in a 403 Forbidden error.
If you have exhausted all other troubleshooting steps, your WAF logs are the next logical place to investigate. You will likely find a rule that needs to be refined or an IP address that requires whitelisting.
Navigating server errors requires a reliable infrastructure partner. At ARPHost, LLC, we provide high-performance bare metal and virtual servers with expert 24/7 support to help you diagnose and resolve issues like the 403 error quickly. Let us manage the hardware so you can focus on building great applications. Explore our managed hosting solutions at https://arphost.com.