


When a new device connects to your network, how does it know its role? In many enterprise environments, the answer is DHCP Option 66. This option functions as a set of initial instructions delivered via DHCP, telling a new device, like a VoIP phone or a bare-metal server, the exact address of a provisioning server. It points the device to a Trivial File Transfer Protocol (TFTP) server, where it can download its configuration files and operational firmware.
This automated handoff is the core mechanism behind zero-touch provisioning, enabling IT teams to deploy network endpoints efficiently and at scale without manual intervention.
What Is DHCP Option 66?
The Dynamic Host Configuration Protocol (DHCP) is universally known for assigning IP addresses, subnet masks, and default gateways to network clients. However, its capabilities extend far beyond basic IP leasing through a series of optional parameters.
DHCP Option 66 is a specific parameter defined in RFC 2132. Its sole function is to provide a client device with the IP address or hostname of a TFTP server.
When a new device connects to the network, it broadcasts a DHCP DISCOVER request. The DHCP server responds with a DHCP OFFER containing the IP lease information. If Option 66 is configured for that client’s scope or class, the OFFER will include the TFTP server’s address. Armed with this information, the device can initiate a connection to the TFTP server to download its bootloader, configuration profiles, or firmware, beginning a fully automated setup process.
Let’s break down the technical specifications of DHCP Option 66.
DHCP Option 66 At a Glance
| Attribute | Description |
|---|---|
| Core Purpose | To provide a client device with the IP address or hostname of a TFTP server. |
| Primary Protocol | Dynamic Host Configuration Protocol (DHCP) |
| Key Function | Enables automated device provisioning by directing devices to their configuration files. |
| Common Use Cases | IP phone deployment, Preboot Execution Environment (PXE) booting, network device setup. |
| Main Benefit | Dramatically simplifies large-scale deployments, reduces manual configuration errors, and ensures operational consistency. |
This option transforms device setup from a manual, error-prone task into a streamlined, automated workflow, which is a cornerstone of modern IT infrastructure management.
The Power of Automated Provisioning
The primary advantage of implementing DHCP Option 66 is automation. It eliminates the need for IT administrators to manually configure each new device via a console cable or web interface. This “set it and forget it” approach is a game-changer for large-scale deployments in environments like data centers or enterprise offices.
The benefits are clear and directly impact operational efficiency:
- Scalability: Deploying hundreds or thousands of devices becomes a predictable and repeatable process.
- Consistency: Every device retrieves its configuration from a centralized source, ensuring uniformity and simplifying troubleshooting.
- Reduced Human Error: Automation minimizes the risk of typos and misconfigurations that occur during manual setups.
A Cornerstone of Modern Provisioning
DHCP Option 66 is not a new technology; its definition in RFC 2132 has made it an indispensable tool for network provisioning for decades, particularly in VoIP and endpoint management.
By 2010, its impact was undeniable. Surveys of network administrators showed that over 75% of organizations using VoIP phones were relying on DHCP Option 66 for auto-provisioning. That high adoption rate speaks volumes about its effectiveness. For any business running a modern phone system, this option is fundamental to how SIP trunking works and is critical for maintaining a stable communications infrastructure.
Core Use Cases for Automated Provisioning
While DHCP Option 66 is a simple instruction, its impact is significant across critical IT functions. It excels in two areas fundamental to modern infrastructure: deploying Voice over IP (VoIP) phones and provisioning bare-metal servers through network booting. In both scenarios, it serves as the initial signpost directing a new device toward a fully automated setup, saving countless hours of manual labor.
This simple flow illustrates how a device uses DHCP Option 66 to locate and retrieve its configuration files from a TFTP server.
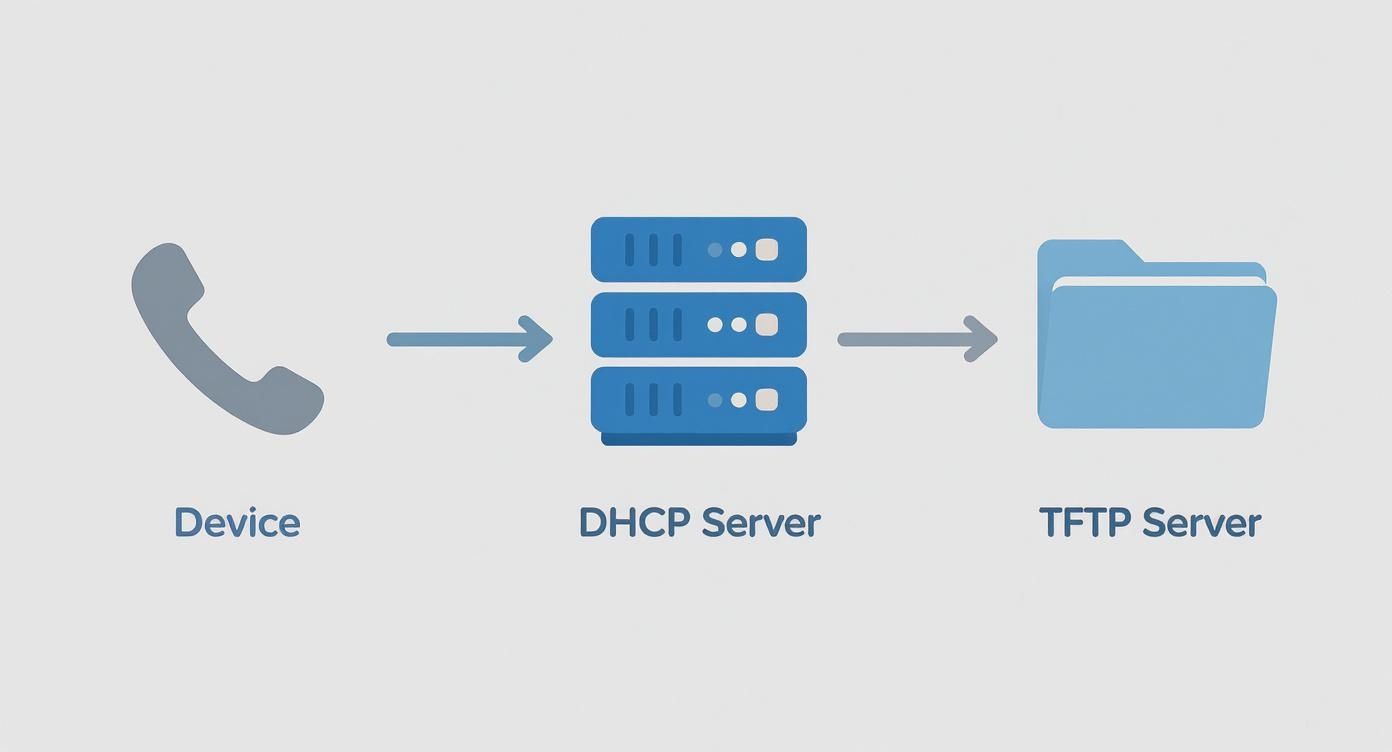
As shown, the process is a clean, three-step handoff from the device to the DHCP server and finally to the TFTP server. This is what makes true zero-touch deployment possible.
Streamlining VoIP Phone Deployment
Manually configuring hundreds of IP phones is not just tedious; it’s a recipe for inconsistency and configuration drift. This is where DHCP Option 66 becomes indispensable for any enterprise voice system. When a new VoIP phone is unboxed and connected to the network, a precise sequence of events is triggered automatically.
Here’s the step-by-step process:
- Power On and DHCP Discovery: The phone powers up and sends a broadcast DHCP DISCOVER packet, searching for a DHCP server on the local network.
- DHCP Offer with Option 66: The DHCP server responds with an IP address lease and includes the IP address of the TFTP server in the Option 66 field of the DHCP OFFER packet.
- TFTP Configuration Fetch: The phone accepts the lease and, now knowing the TFTP server’s location, contacts it to request its configuration file. This is often a generic master file (e.g.,
000000000000.cfg) or one specific to its MAC address. - Automated Setup: The initial configuration file typically directs the phone to download specific firmware, user extension details, directory lists, and other settings. The phone applies the configuration and registers with the PBX—all without human intervention.
By automating this entire lifecycle, administrators can ship phones directly to remote offices. Staff only need to plug them in, and Option 66 handles the rest, ensuring every device is configured correctly according to central policies.
Automating Bare-Metal Server Provisioning with PXE
Another powerful application for DHCP Option 66 is in the Preboot Execution Environment (PXE). PXE allows a server to boot from an executable file located on the network rather than from local storage. This capability is the bedrock of automating operating system installations on bare-metal hardware, ideal for deploying hypervisors like Proxmox VE or entire server clusters in a private cloud environment.
When a new server is racked and connected, its network interface card (NIC) can be configured for a PXE boot. The server, having no OS, initiates a network boot process.
The automated installation follows these steps:
- The server’s NIC broadcasts a DHCP request that identifies it as a PXE client.
- The DHCP server replies with an IP address and uses Option 66 to point the server to a TFTP server. It often also provides Option 67 (Bootfile Name).
- The server contacts the TFTP server and downloads a network boot program (NBP), such as
pxelinux.0orwdsnbp.com. - The NBP takes over, loading a kernel and an initial RAM disk (
initrd) to begin the automated OS installation process, often guided by a Kickstart or Preseed file.
This method allows system administrators to deploy Proxmox VE, Windows Server, or custom Linux images across dozens of servers simultaneously. For more complex setups, this can be paired with templates. You can learn more about creating a Debian Cloud-Init template in Proxmox in our detailed guide. This combination of PXE booting and templating creates a highly scalable and repeatable deployment pipeline.
Configuring DHCP Option 66 on Major Platforms
Once the need for DHCP Option 66 is established, the next step is implementation. The configuration process varies depending on the DHCP server software or hardware in use. This section provides hands-on, step-by-step instructions for some of the most common DHCP servers in the IT industry, from Linux-based systems to enterprise-grade network hardware.
Each example serves as a template that can be adapted to your infrastructure. We will focus on best practices, such as using IP addresses instead of hostnames to avoid DNS dependencies during the critical device boot-up phase.
Windows Server DHCP
For many organizations, Windows Server provides core network services. Configuring DHCP Option 66 through its graphical interface is straightforward. The option can be set globally (Server Options) or, more commonly, at the scope level (Scope Options) for more granular control.
Applying the option at the scope level is best practice, as it allows you to direct different device types in separate VLANs to unique TFTP servers.
Here’s the step-by-step guide for a single DHCP scope:
- Open the DHCP management console from Server Manager.
- Navigate to your server, expand IPv4, and locate the desired scope.
- Right-click on Scope Options and select Configure Options….
- In the Available Options list, scroll down and check the box for 066 Boot Server Host Name.
- In the String value data entry field, enter the static IP address of your TFTP server (e.g.,
192.168.10.20). - Click Apply, then OK. The option is now active for any client leasing an IP from this scope.
Best Practice: Always use the TFTP server’s raw IP address, not its hostname. This creates a more resilient provisioning process by eliminating any dependency on DNS resolution, which may not be available when a new device is first booting.
Linux with ISC DHCPd
The ISC DHCP server (dhcpd) is a widely deployed, robust solution on Linux distributions like Debian and CentOS. Configuration is managed through a text file, typically located at /etc/dhcp/dhcpd.conf.
To enable DHCP Option 66, add the option tftp-server-name directive within the desired subnet declaration.
Here is a sample configuration snippet for a VoIP subnet:
# DHCP scope for the VoIP phone subnet
subnet 192.168.30.0 netmask 255.255.255.0 {
  range 192.168.30.100 192.168.30.200;
  option routers 192.168.30.1;
  option domain-name-servers 8.8.8.8, 8.8.4.4;

  # Define DHCP Option 66 to point to the TFTP server
  option tftp-server-name "192.168.30.11";
}
After adding or modifying the option tftp-server-name line, save the file and restart the dhcpd service to apply the change. On systemd-based systems, use sudo systemctl restart isc-dhcp-server.
Cisco IOS for Routers and Switches
On Cisco devices running IOS, the DHCP server is often configured directly on a Layer 3 switch or router serving as the gateway for a VLAN. The command-line interface (CLI) is used to define the DHCP pool and its associated options.
The configuration is straightforward. Enter the DHCP pool configuration mode and apply the option.
Follow these CLI steps:
# Enter global configuration mode
configure terminal

# Enter the configuration for the desired DHCP pool
ip dhcp pool VOICE-VLAN

# Set the TFTP server using Option 66
option 66 ip 192.168.30.11

# Exit configuration modes
end

# Save the running configuration to startup
write memory
With this configuration, any device leasing an IP address from the VOICE-VLAN pool will be directed to 192.168.30.11 as its TFTP server.
Juniper Junos for Network Devices
Configuring DHCP Option 66 on Juniper devices running Junos is equally simple, though the syntax follows a different, hierarchical structure.
Configuration is managed within the [edit system services dhcp-local-server] hierarchy.
Here is a sample Junos configuration:
# Enter configuration mode
configure

# Navigate to the DHCP server settings for a specific pool
edit system services dhcp-local-server group VOICE-POOL interface ge-0/0/10.0

# Set the TFTP server IP address using option 66
set pool-match ip-address-range low 192.168.30.100
set pool-match ip-address-range high 192.168.30.200
set option 66 string "192.168.30.11"

# Commit the changes to activate them
commit and-quit
This structured approach is highly beneficial for automation, as it integrates well with infrastructure-as-code pipelines that can push configurations programmatically.
The use of DHCP Option 66 has seen explosive growth, especially in the Asia Pacific region, where rapid digitalization has created a massive need for efficient network management. Between 2015 and 2023, the number of businesses in countries like China, India, and Japan using this option for device provisioning jumped by over 120%. By 2023, more than 85% of new VoIP phone deployments in that region relied on DHCP Option 66 for auto-provisioning, compared to just 70% globally. You can find more details on these VoIP trends and DHCP configurations.
Advanced Strategies and Security Best Practices
Implementing DHCP Option 66 is the first step. Building a resilient and secure provisioning system requires a deeper understanding of how DHCP options interact and how to protect the provisioning process from network threats. This involves coordinating multiple DHCP options, managing diverse hardware, and actively defending your network infrastructure.
Properly configured advanced options will create a more robust provisioning workflow, while strong security measures will ensure these automated tools cannot be exploited.
Coordinating Options 66, 67, and 150
While Option 66 specifies the TFTP server, it often works in conjunction with other options to provide complete boot instructions. Understanding their relationship is critical to avoid conflicts and ensure successful device provisioning.
- DHCP Option 66 (TFTP Server Name): Answers the question: Where is the TFTP server? It provides an IP address or hostname.
- DHCP Option 67 (Bootfile Name): Answers the question: What file should the client request? It specifies the network boot program (NBP), such as
pxelinux.0for legacy BIOS systems orbootx64.efifor UEFI hardware. - DHCP Option 150 (Cisco TFTP Server): A proprietary Cisco option designed for their IP phones. Its primary advantage is the ability to provide a list of TFTP server IP addresses, adding redundancy that Option 66 lacks.
In practice, Cisco devices prioritize Option 150. In a mixed-vendor network, it’s best practice to configure both: Option 66 for non-Cisco devices and Option 150 for Cisco phones. This ensures all devices receive the correct instructions.
Using Vendor Classes for Mixed Environments
When a single network segment contains devices from multiple vendors (e.g., Polycom, Yealink, Cisco), each requiring a different boot file, DHCP Vendor Class Identifiers (VCI), or Option 60, become essential.
A device can identify its vendor and model in its DHCP request using its VCI. The DHCP server can be configured to recognize these identifiers and deliver a tailored set of DHCP options—including a specific Option 66 and 67—based on the vendor class.
Here’s the workflow:
- A Polycom phone sends a DHCP DISCOVER with a VCI of “Polycom-VVX400”.
- The DHCP server matches this VCI and replies with
Option 66 -> 192.168.10.20andOption 67 -> poly.cfg. - A Yealink phone sends a DHCP DISCOVER with a VCI of “yealink sip-t23g”.
- The server matches the Yealink VCI and provides
Option 66 -> 192.168.10.20andOption 67 -> y000000000000.boot.
This technique allows a single DHCP server to support a diverse fleet of hardware, keeping network scopes clean and manageable.
Hardening Your Provisioning Process
Automated provisioning delivers significant efficiency gains, but its reliance on unencrypted protocols like DHCP and TFTP introduces security risks. An attacker on the local network could exploit this process to compromise devices or cause service disruptions.
A compromised provisioning process can lead to widespread device misconfiguration, service outages, or even the injection of malicious firmware. Securing this foundational layer is not optional; it’s a critical component of your overall network defense strategy.
The two primary threats are:
- Rogue DHCP Servers: An attacker can deploy an unauthorized DHCP server that responds to client requests faster than the legitimate one. This rogue server can provide a malicious DHCP Option 66, redirecting devices to a compromised TFTP server to load malicious firmware or configurations.
- TFTP Poisoning: As TFTP lacks authentication, an attacker could intercept a device’s file request and send a malicious file before the legitimate server responds.
The most effective defense against these vulnerabilities is implemented at the network switch level. DHCP snooping is a Layer 2 security feature on managed switches that allows you to define “trusted” ports (where your legitimate DHCP server is connected). The switch then blocks DHCP server messages from all other “untrusted” ports, effectively neutralizing rogue DHCP servers. Understanding your environment is critical, and many of the same principles apply when exploring cloud computing security risks, which often overlap with on-premise infrastructure management.
Troubleshooting Common Option 66 Failures
Even with careful planning, provisioning systems can fail. When a new device powers on but fails to configure itself, the issue often lies within the DHCP process. A methodical troubleshooting approach, starting from the client and tracing the communication path, is key to resolving DHCP Option 66 issues quickly and minimizing deployment delays.
The investigation should always begin at the source: the endpoint device. Determining what information the device is receiving—or not receiving—is the most critical first step. From there, you can systematically check the DHCP server, network path, and TFTP server to identify the point of failure.
Start with the Client Device
Before investigating the network or server, examine the client device itself. Most IP phones and PXE boot environments provide a diagnostic screen or log file showing the current network lease details. This should always be your first check. Confirm whether the device received an IP address from the correct scope and, most importantly, if it received the DHCP Option 66 parameter at all.
If the Option 66 value is missing or incorrect, your focus should shift to the DHCP server configuration. A simple typo in a MAC address reservation or placing the device in the wrong VLAN can cause it to receive a lease from a scope where Option 66 is not defined.
Analyze the Network Traffic
If client-side logs are unavailable, the next step is to capture and analyze the network conversation. Packet capture tools like tcpdump or the graphical Wireshark are invaluable for this. By configuring a mirrored port (SPAN) on the switch connected to the device, you can capture the entire DHCP DORA (Discover, Offer, Request, Acknowledge) sequence.
By inspecting the DHCP Offer packet in a capture, you can definitively verify whether the server is sending Option 66 and confirm its value is correct. This technique eliminates guesswork and instantly isolates the problem to either a server misconfiguration or a client-side issue.
Running tcpdump -i eth0 port 67 or port 68 -v on a machine connected to the mirrored port will display the DHCP exchange in real-time.
Scrutinize Server-Side Configurations
If a packet capture confirms the DHCP server is not sending Option 66, the issue is on the server itself. Log in and review the DHCP configuration. The most common causes are simple human errors.
Look for these specific issues:
- Typographical Errors: An incorrect IP address in the
option tftp-server-namevalue is a frequent mistake. - Incorrect Scope: Ensure the option is applied to the correct DHCP scope or subnet for the client device.
- Service Restart Needed: Many DHCP servers, especially Linux-based ones like
isc-dhcpd, require a service restart to apply configuration changes. A command likesystemctl restart isc-dhcp-servermay be all that is needed. - Vendor Class Mismatch: If using Vendor Class Identifiers (VCI), ensure the VCI string configured on the server perfectly matches what the device is sending in its DHCP request.
Check the TFTP Server and Path
If the client receives the correct Option 66 IP but still cannot download files, the issue lies with the TFTP server or the network path to it. TFTP is a simple UDP-based protocol that uses port 69.
Your troubleshooting checklist should include:
- Firewall Rules: Verify that no firewalls on the server or network are blocking UDP port 69.
- TFTP Service Status: Confirm the TFTP service is running on the server. A command like
systemctl status tftpd-hpacan verify this. - File Permissions: The TFTP service runs as a specific user, which must have read permissions on the files it serves. An
ls -lcommand in the TFTP root directory can identify permission issues. - File Path and Naming: Confirm the boot file requested by the client (often specified in Option 67) exists in the correct TFTP directory and is named correctly. A missing or misspelled boot file is a primary cause of PXE boot failures.
Answering Your Questions About DHCP Option 66
As you implement DHCP Option 66, several common questions arise. Addressing these helps prevent misconfigurations and builds a more robust provisioning system.
Should I Use an IP Address or a Hostname?
While the RFC allows for a hostname, industry best practice is to always use a static IP address for the Option 66 value.
Using a hostname introduces a dependency on DNS. A device booting for the first time may not have a fully initialized network stack, or the DNS server may be unreachable or slow to respond. If the device cannot resolve the hostname, the entire provisioning process fails.
Using a raw IP address eliminates this potential point of failure, making the automated setup more resilient, predictable, and easier to troubleshoot.
What Is the Difference Between Option 66 and Option 150?
This is a frequent point of confusion. Both options can direct a client to a TFTP server, but they are not interchangeable and were designed for different purposes.
- Option 66 is the IETF standard defined in RFC 2132. It is universally supported by a wide range of vendors for PXE booting and provisioning non-Cisco VoIP phones.
- Option 150 is a proprietary Cisco option designed to provide a list of one or more TFTP server IP addresses to Cisco IP phones, enabling built-in redundancy and failover.
The key takeaway is that Cisco devices prioritize Option 150. In a mixed-vendor network, you should configure Option 66. In a pure Cisco voice environment, Option 150 is the preferred choice for its resiliency features.
How Does Option 66 Work Across Different Subnets?
DHCP Option 66 functions seamlessly across routed networks when a DHCP relay agent is properly configured. This feature, often called an “IP helper address” on routers and Layer 3 switches, is essential for centralized DHCP services.
Here is the process:
- A client on a remote subnet broadcasts a DHCP DISCOVER packet.
- The local router’s DHCP relay agent intercepts this broadcast.
- The agent forwards the request as a unicast packet to the configured central DHCP server, which can be several network hops away.
- The DHCP server sends its OFFER, including DHCP Option 66, back to the relay agent.
- The relay agent delivers the unicast offer to the original client on the local subnet.
This standard mechanism ensures that all DHCP options, including 66, are delivered reliably regardless of network topology, allowing for centralized management from a single DHCP server.
At ARPHost, LLC, we provide the high-performance infrastructure and expert support you need to build and manage robust network environments. From bare metal servers for your DHCP and TFTP services to scalable Proxmox private clouds, we deliver reliable solutions that grow with your business. Discover our full range of managed and unmanaged hosting services at https://arphost.com.