


To configure a static IP on an Ubuntu server, you must modify its core network settings to assign a permanent, unchanging address. This is a non-negotiable step for any production server, as it guarantees stable and predictable network connectivity for critical services like web hosting, DNS, or remote SSH access within enterprise environments, including bare metal, KVM, and private cloud infrastructure.
Why a Static IP Is Critical for Your Ubuntu Server
In any professional server deployment, relying on DHCP (Dynamic Host Configuration Protocol) to assign a server's address is an operational liability. A server is not a transient client device like a laptop; its network address must be a fixed, reliable endpoint. Without a static IP, you create a moving target for every service, client, and management tool attempting to establish a connection.

Consider the consequences of a production web or mail server acquiring a new IP address after a routine reboot. DNS records would become instantly stale, IP-based firewall rules would block legitimate traffic, and all active user connections would be terminated. This scenario is precisely why a static IP is the industry standard for bare metal servers, VMs in a Proxmox VE cluster, and any private cloud infrastructure.
The Foundation of Network Stability
A static IP is the bedrock of reliable network services. It is not an optional enhancement; it directly impacts several key areas of server management, transforming unpredictable network behavior into deterministic, mission-critical operation.
Here’s where it makes a functional difference:
- Uptime and Reliability: Services such as web servers (Apache/Nginx), mail relays (Postfix), and VPN endpoints remain consistently accessible. A fixed IP eliminates the risk of downtime caused by DHCP lease expirations or failures.
- DNS and Name Resolution: The server’s hostname, which is mapped to its IP via DNS A and AAAA records, remains accurate. This is fundamental to ensuring domain names resolve to the correct machine.
- Simplified Firewall Management: Security rules on network hardware (e.g., Juniper firewalls) or software firewalls (iptables, UFW) are predominantly IP-based. A static address ensures these critical rules are consistently applied to the correct server without requiring dynamic updates.
- Streamlined Monitoring and Management: Network monitoring systems can reliably track server performance, latency, and health when the target IP is constant. This simplifies everything from automated alerting to incident response protocols.
Real-World Impact in Managed Environments
In a managed hosting environment, predictability is paramount. When we provision infrastructure for clients—whether it’s a single virtual server or a complex private cloud—static IPs are a baseline requirement. For instance, most businesses configure Ubuntu servers with a static IPv4 address because a fixed network identity is critical for web hosting, mail, DNS, and VPNs. Production roles demand predictable addressing so that DNS records, firewall rules, and SSL certificate automation don’t break every time an address changes.
You can see how this piece of the puzzle fits into the bigger picture by reviewing a technical guide to small business server solutions.
A dynamic IP on a server is an operational liability. Every time an address changes, you risk breaking dependencies across your entire infrastructure—from DNS and SSL certificates to backup scripts and monitoring alerts. A static IP removes this variable entirely.
Ultimately, taking the time to configure a static IP for your Ubuntu server is a foundational step. It transforms the machine from just another client on the network into a permanent, reliable piece of your infrastructure, ready to deliver services securely and without interruption.
Gathering Your Network Information
Before modifying any configuration files to set a static IP on your Ubuntu server, meticulous preparation is mandatory. This is the most critical phase of the process. A single error—a typo in the gateway address or an incorrect interface name—can sever network connectivity, requiring out-of-band access to remediate. The objective is to gather all required network parameters before initiating any changes.
First, you must identify the primary network interface. Legacy naming conventions like eth0 are deprecated. Modern Ubuntu systems use predictable, hardware-based names, such as ens18, eno1, or enp0s3.
Identifying Your Network Interface
The most efficient method to list network interfaces and their current state is with the ip command, the modern replacement for the outdated ifconfig.
Execute the following command in your terminal:ip a
The output will list all network devices. Ignore the loopback interface (lo). You are looking for the interface that currently holds the server's IP address. Record this name, as it is required for the Netplan configuration.
Finding Your Gateway and Current IP Details
Next, identify the default gateway. This is the router your server uses for all traffic destined for external networks. An incorrect gateway configuration will isolate the server from the internet.
You can find it with another ip command:ip r
Locate the line beginning with default via. The IP address on that line is your gateway. This command, along with ip a, also reveals your current IP address and its subnet in CIDR notation (e.g., /24). You will need this information if you intend to make the server's current dynamic IP its new static assignment.
A Pro Tip From Experience
Before applying any network changes over SSH, ensure you have out-of-band access. For a bare-metal server, this means having a KVM over IP connection ready. For a VM, use the hypervisor's built-in console, such as the noVNC console in the Proxmox VE dashboard. This is your safety net; if you misconfigure the network and lose SSH access, the console provides direct access to fix the error.
Finally, you need the IP addresses for your DNS resolvers. These servers are responsible for translating domain names into IP addresses. Your hosting provider or network administrator may provide specific resolver IPs. If not, you can use reliable public resolvers.
To summarize, here are the four critical pieces of information you must have before proceeding:
- Network Interface Name (e.g.,
ens18) - Static IP Address & Subnet (e.g.,
192.168.1.100/24) - Default Gateway Address (e.g.,
192.168.1.1) - DNS Server Addresses (e.g.,
8.8.8.8,1.1.1.1)
How to Configure a Static IP with Netplan
With your network parameters collected, you can proceed with the configuration. On all modern Ubuntu Server releases—18.04, 20.04, 22.04, and newer—network management is handled by Netplan. This utility uses a declarative YAML syntax to define network interfaces, a significant improvement over the legacy /etc/network/interfaces file.
Netplan provides a unified, predictable configuration method across different environments, whether you are managing bare metal servers, KVM virtual machines, or nodes in a private cloud. Proficiency with Netplan is non-negotiable for any sysadmin managing contemporary Ubuntu systems.
Locating and Editing Your Netplan Configuration
First, locate the correct configuration file. Netplan stores its configuration in the /etc/netplan/ directory. Files use a .yaml extension and are typically named 00-installer-config.yaml or 50-cloud-init.yaml.
Use the ls command to view the directory contents:ls /etc/netplan/
Once you identify the file, open it with root privileges using a text editor like nano or vim. If you are new to terminal-based editors, our guide on how to edit a file in Linux is a valuable resource.
Open the file using nano:sudo nano /etc/netplan/00-installer-config.yaml
A critical warning: YAML syntax is extremely sensitive to indentation. You must use spaces, not tabs. Incorrect indentation is the most common cause of Netplan configuration failures.
The flowchart below illustrates the preparatory steps required before editing this file.
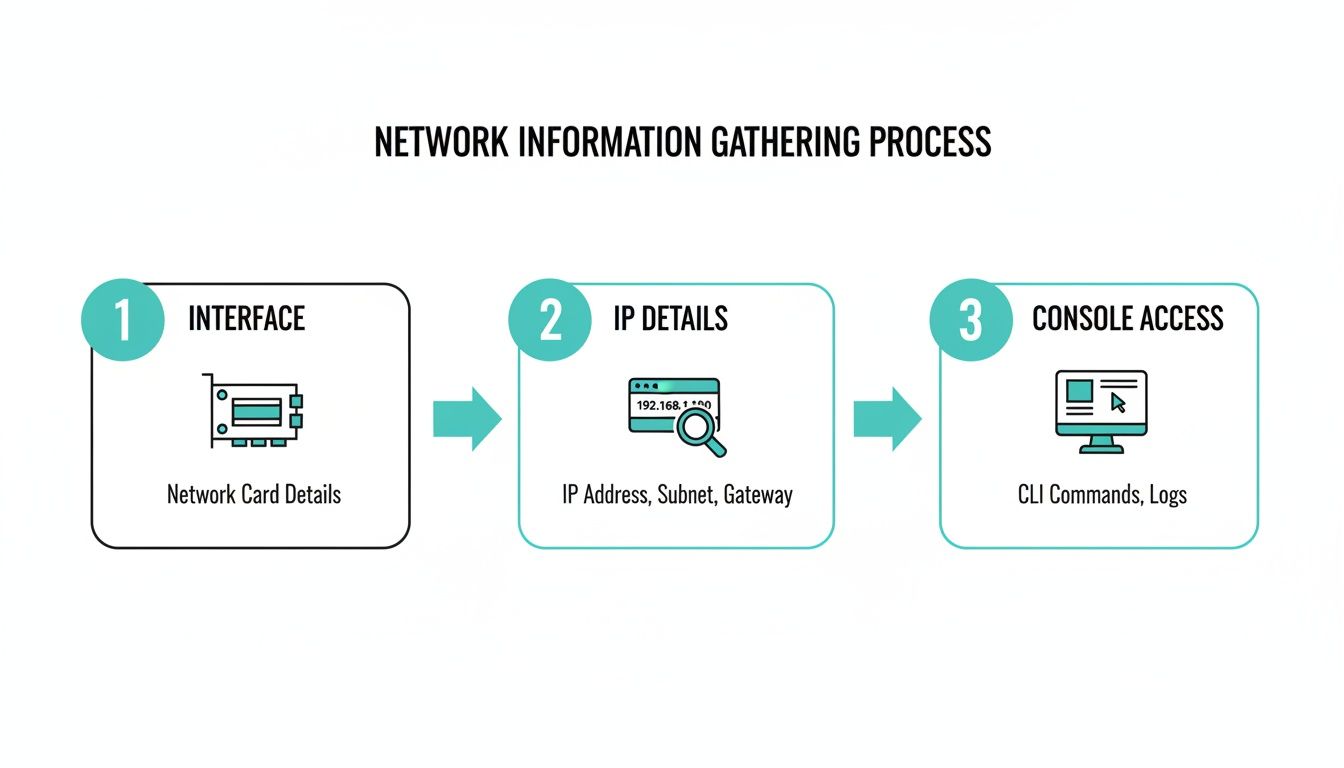
As shown, identifying your interface name, IP details, and ensuring out-of-band console access are essential prerequisites.
A Standard Static IP Configuration Example
Now, let's modify the file to configure a static IP on your Ubuntu server. Your existing configuration likely shows the interface configured for DHCP. We will replace that with our static settings.
The following is a standard, best-practice example. Ensure you replace the interface name (ens18) and all IP addresses with the information you gathered previously.
network:
  version: 2
  renderer: networkd
  ethernets:
    ens18:
      dhcp4: no
      addresses:
        - 192.168.1.100/24
      routes:
        - to: default
          via: 192.168.1.1
      nameservers:
        addresses: [8.8.8.8, 1.1.1.1]
This table breaks down each parameter for clarity.
Netplan Configuration Breakdown for Static IP
This table details the key-value pairs used in the Netplan YAML file to set a static IP address, explaining the purpose and format of each line.
| Parameter | Description | Example Value |
|---|---|---|
| version | Specifies the Netplan configuration file version. 2 is the current standard. | 2 |
| renderer | Defines the backend to render the configuration. networkd is the default for servers. | networkd |
| ethernets | A block containing definitions for one or more physical network interfaces. | ens18: |
| dhcp4 | A boolean (yes or no) to enable or disable DHCP for IPv4. Set to no for a static IP. | no |
| addresses | A list of static IP addresses for the interface, specified in CIDR notation (IP/subnet). | - 192.168.1.100/24 |
| routes | A list defining routing rules. This is the modern syntax for setting the default gateway. | to: default, via: 192.168.1.1 |
| nameservers | A block containing DNS server addresses for domain name resolution. | addresses: [8.8.8.8, 1.1.1.1] |
Essentially, you're learning how to change your IP address on a server, a core skill for any sysadmin.
Advanced Example: Multiple IP Addresses
In enterprise hosting and private cloud environments, it is common for a server to require multiple IP addresses on a single interface for tasks like hosting multiple SSL-secured websites or isolating services. Netplan handles this requirement elegantly.
Simply add the additional IP addresses to the addresses list.
network:
  version: 2
  renderer: networkd
  ethernets:
    ens18:
      dhcp4: no
      addresses:
        - 192.168.1.100/24
        - 192.168.1.101/24
        - 10.10.20.50/22
      routes:
        - to: default
          via: 192.168.1.1
      nameservers:
        addresses: [8.8.8.8, 1.1.1.1]
This flexibility is a primary reason Netplan has become the standard for modern network configuration on Ubuntu.
Applying Changes with the Failsafe netplan try Command
After saving the configuration file, you must apply the changes. A common mistake is to immediately run netplan apply. If you have introduced an error while connected via SSH, this command will likely sever your connection permanently, necessitating out-of-band console access.
The professional, industry-standard method is to use
netplan try. This command applies the configuration but also initiates a 120-second timer. If you do not confirm that the network is functional by pressing Enter, it automatically reverts to the previous known-good configuration.
This is the only command that should be used for applying remote network changes:sudo netplan try
After execution, a prompt will appear asking for confirmation. At this point, open a separate terminal to test connectivity—ping the gateway, an external site, and attempt a new SSH connection. If successful, return to the first terminal and press Enter to commit the changes. If you are locked out, wait two minutes for the automatic rollback.
Static IPs in Virtualized and Cloud Environments
When managing virtualized infrastructure, the methodology for network configuration often shifts from the guest OS to the hypervisor or automation layer. In these environments, you frequently do not configure a static IP on your Ubuntu server by editing files within the OS. Instead, network identity is managed at a higher level, providing greater control, scalability, and consistency across a fleet of virtual machines.
Understanding this distinction is critical for anyone managing infrastructure on platforms like Proxmox VE, VMware vSphere, or any private cloud. Attempting to modify network settings from within a VM can conflict with the hypervisor's management plane, leading to network segmentation and connectivity failures. The industry best practice is to manage network settings from the layer that controls the virtual hardware.

Hypervisor-Level Network Management in Proxmox
Virtualization platforms like Proxmox VE provide granular control over the virtual network interfaces (vNICs) attached to VMs and containers. While setting a static IP inside the Ubuntu guest OS via Netplan is possible, a superior approach is to manage networking at the hypervisor level.
Within Proxmox, you can configure dedicated Linux bridges, manage VLAN tagging, and apply firewall rules directly from the web interface. This centralizes network policies and ensures a VM’s network identity is defined before its first boot. For any organization migrating to a virtualized data center, robust cloud migration network planning is essential. Defining your IP address management (IPAM) strategy at the hypervisor level is a core component of this planning.
Automating Static IPs with Cloud-Init
In cloud environments and for any automated VM provisioning workflow, cloud-init is the de facto industry standard for initial server configuration. It allows for the programmatic setup of a new VM on its first boot, handling tasks like setting the hostname, creating users, and, critically, assigning a static IP address. This enables the scalable and repeatable deployment of servers from a single master template.
Instead of manually logging into each new VM to edit Netplan files, you provide cloud-init with user-data and network-config directives during the template cloning process. This is an exceptionally powerful method for provisioning hundreds of servers with consistent network configurations.
By leveraging
cloud-init, you are embracing an Infrastructure as Code (IaC) approach to networking. This method eliminates manual configuration errors and ensures that every deployed server adheres to your predefined network architecture from the moment it comes online.
Below is a practical example of a cloud-init network configuration. This YAML snippet would be passed to a VM at creation time to automatically assign its static IP.
#cloud-config
network:
  version: 2
  ethernets:
    ens18:
      dhcp4: false
      addresses:
        - 10.10.1.55/24
      routes:
        - to: default
          via: 10.10.1.1
      nameservers:
        addresses: [9.9.9.9, 1.1.1.1]
This configuration achieves the same outcome as our manual Netplan edit but does so autonomously, with zero human intervention. For a detailed walkthrough of this automation technique, see our guide on creating a Debian cloud-init template in Proxmox; the principles are directly applicable to Ubuntu. Mastering cloud-init is an essential skill for efficiently managing virtual server fleets and private cloud infrastructure.
Verifying and Troubleshooting Your Connection
Once the configuration is applied, the final step is verification. A successful change is a verified change. You must confirm that the new static IP is active and that the server has full network connectivity, both internally and to the internet.
This process serves as a post-deployment checklist. We will confirm the IP address assignment, gateway reachability, and DNS resolution. Neglecting this step can leave a server in a partially connected state, leading to intermittent and difficult-to-diagnose issues later.
Core Verification Commands
To obtain a snapshot of the new network state, start with these essential commands. Each command tests a different layer of the network stack, providing a comprehensive view of its status.
- Check the IP Address Assignment
Useip addr show(or its aliasip a). This command lists all network interfaces and their assigned IP addresses. Locate the interface you configured and verify that your new static IP is present with the correct CIDR subnet mask (e.g.,/24). - Verify the Default Gateway
Next, executeip route(orip r) to inspect the server's routing table. You are looking for a line that begins withdefault via. This entry must show the gateway IP you specified in your Netplan file. If this route is missing or incorrect, the server cannot route traffic beyond its local subnet. - Confirm DNS Resolution
Finally, test DNS. Theresolvectl statuscommand provides a detailed view of the currently configured DNS servers. A more direct and practical test is to use a tool likedigorpingto resolve an external domain name.ping google.com
A stable, static IP address is fundamental to reliable network operations. Deploying static IPs for Ubuntu servers means services retain the same address, simplifying DNS TTLs and certificate automation like Let's Encrypt. Industry tooling can reduce related incidents by an estimated 40–80% when static addressing is paired with automated DNS updates instead of frequent DHCP churn. Find out more about how to configure static and dynamic IP addresses in Ubuntu.
Common Troubleshooting Scenarios
Even with careful preparation, issues can arise. If you lose connectivity after you configure a static IP on your Ubuntu server, the cause is almost always a minor error in the Netplan configuration. Here are solutions to common problems encountered in managed hosting environments.
Problem 1: YAML Syntax Errors
The most frequent cause of Netplan failures is invalid YAML syntax. The parser is extremely strict regarding indentation and formatting.
- Solution: Run
sudo netplan generate. This command validates the.yamlfile and reports any syntax errors, often indicating the specific line number. Remember: YAML requires spaces for indentation, not tabs.
Problem 2: Gateway Not Reachable
The configuration is applied, and you can ping other devices on the local subnet, but you cannot reach the internet. This is a classic symptom of a gateway misconfiguration.
- Solution: Re-examine the
routesentry in your Netplan file for typographical errors. Confirm that the gateway IP is correct and, crucially, that it resides on the same subnet as your static IP. For example, a server with the IP192.168.1.100/24cannot use a gateway of10.0.0.1.
Problem 3: Total Connectivity Loss
This is the most severe scenario. After running netplan apply, your SSH session freezes, and the server becomes unresponsive to pings.
- Solution: This situation underscores the importance of out-of-band console access (KVM-over-IP or a hypervisor console). Log in via the console, correct the error in the Netplan file, and re-apply the configuration. This scenario is precisely why
netplan tryis the industry best practice for remote changes; it would have detected the failure and automatically reverted the faulty configuration.
Answering Common Questions About Ubuntu Static IPs
Even with a detailed guide, specific questions often arise when implementing a static IP on an Ubuntu server. This is particularly true when dealing with different Ubuntu versions, dual-stack IPv6 configurations, or the operational nuances of Netplan's commands. Let's address some of the most common technical queries from system administrators.
How Do I Add a Static IPv6 Address in Netplan?
Configuring a static IPv6 address is not only possible but also essential for modern, dual-stack network environments. The process is straightforward: you add the IPv6 address and its gateway to the existing Netplan YAML file alongside the IPv4 configuration.
Append the IPv6 address (with its prefix, e.g., /64) to the addresses list. The gateway should be defined under the routes section, which is the current best practice. While the legacy gateway6 key may appear in older examples, using routes for both protocols ensures consistency.
Here is a clean, dual-stack configuration example:
network:
  version: 2
  renderer: networkd
  ethernets:
    ens18:
      dhcp4: no
      dhcp6: no
      addresses:
        - 192.168.1.100/24
        - "2001:db8::10/64"
      routes:
        - to: default
          via: 192.168.1.1
        - to: default
          via: "2001:db8::1"
      nameservers:
        addresses: [8.8.8.8, "2001:4860:4860::8888"]
This configuration ensures the server can communicate over both IPv4 and IPv6, a requirement for modern internet-facing services.
What Is the Difference Between Netplan Apply and Netplan Try?
Understanding the distinction between these two commands is critical for remote server administration, as it directly impacts operational risk.
sudo netplan apply: This command is atomic and final. It immediately applies the new network configuration. If the configuration contains an error that severs network connectivity, you will be locked out, requiring out-of-band access to recover.sudo netplan try: This is the failsafe command. It applies the new settings but also initiates a 120-second timer. If the administrator does not pressEnterto confirm functionality within this window, Netplan automatically reverts to the previous known-good configuration.
Always use
netplan trywhen applying network changes over SSH. This simple best practice has prevented countless instances of server lockouts caused by minor configuration typos.
How Do I Set a Static IP on Older Ubuntu Versions?
If you are managing a legacy system running Ubuntu 16.04 LTS or older, Netplan is not used. Prior to version 18.04, networking was configured via the /etc/network/interfaces file. The syntax is fundamentally different from Netplan's YAML.
You will edit /etc/network/interfaces directly. Locate the stanza for your primary interface (often eth0), change its method from dhcp to static, and then define the network parameters.
Here is a classic configuration example for eth0:
# The primary network interface
auto eth0
iface eth0 inet static
    address 192.168.1.100
    netmask 255.255.255.0
    gateway 192.168.1.1
    dns-nameservers 8.8.8.8 1.1.1.1
After saving the file, execute sudo systemctl restart networking to apply the changes.
Can I Assign Multiple Static IPs to One Interface?
Yes, this is a standard and common practice in hosting and virtualization. Assigning multiple IPs to a single interface is essential for hosting multiple SSL-secured sites, running containerized services with unique IPs, or segmenting traffic.
Netplan simplifies this process significantly. There is no need for complex interface aliasing (eth0:0). You simply add each IP address as a new item in the addresses list.
Consider this configuration for an interface handling three separate IP addresses:
network:
  version: 2
  renderer: networkd
  ethernets:
    ens18:
      dhcp4: no
      addresses:
        - 192.168.1.100/24
        - 192.168.1.101/24
        - 172.16.30.5/22
      routes:
        - to: default
          via: 192.168.1.1
      nameservers:
        addresses: [8.8.8.8, 1.1.1.1]
This clean, list-based approach is a key strength of Netplan, making complex network topologies significantly easier to manage and debug compared to legacy methods.
At ARPHost, LLC, we provide the rock-solid infrastructure and expert guidance you need to manage your servers with confidence. Whether you're deploying a single VPS or a complex Proxmox private cloud, our solutions are built for performance and reliability. Explore our managed and unmanaged server options at https://arphost.com to find the perfect fit for your technical needs.